If you’re a solopreneur or running a small business, your time is your most valuable, non-renewable resource. Yet, so much of it is drained by the administrative burden of scheduling. We've all been trapped in the dreaded email ping-pong with potential prospects.
This isn't just annoying; it's expensive. Each extra email increases the chances a prospect will lose interest and choose a competitor. When the booking process is hard, you lose the booking.
While external tools like Calendly or Acuity stop the ping-pong, they create a new, expensive headache: data disconnection. The booking information lives in one silo, and your lead data (the CRM) is stuck in another, forcing you to pay more for disjointed tools.
Feature: Integrated Scheduling (GHL Calendars)
The GoHighLevel (GHL) Calendars feature is a fully integrated conversion tool that natively connects scheduling to your CRM and sales workflows. It eliminates the hassle of administrative scheduling and the "data disconnection" created by external tools like Calendly or Acuity, where booking data is siloed from your lead data.
Benefits:
- Eliminate Time-Wasting Email Ping-Pong: Stop losing hours to the dreaded email back-and-forth, saving your most valuable, non-renewable resource: time.
- Prevent Lead Loss Due to Friction: A hard booking process costs money. By simplifying and accelerating the booking, you decrease the chance your prospect will lose interest and go to a competitor.
- Solve Data Disconnection: You ditch the newer and more expensive problem of data silos, where you pay for tools that don't talk to your central marketing system (CRM).
Practical Outcome:
By the end of this practical, step-by-step guide, you will have a live, integrated scheduling calendar that automatically qualifies leads, prevents double-booking, and eliminates no-shows with automated reminders.
Step 1: Integrated Calendar & Availability Management
GoHighLevel Calendar is not just a simple booking link. It works like a fully integrated scheduler that syncs with your personal Google or Outlook calendar to stop the problem with double booking. The software also gives you access to advanced controls to set your working availability and buffer times.
How to Set Up Your Calendar Foundation
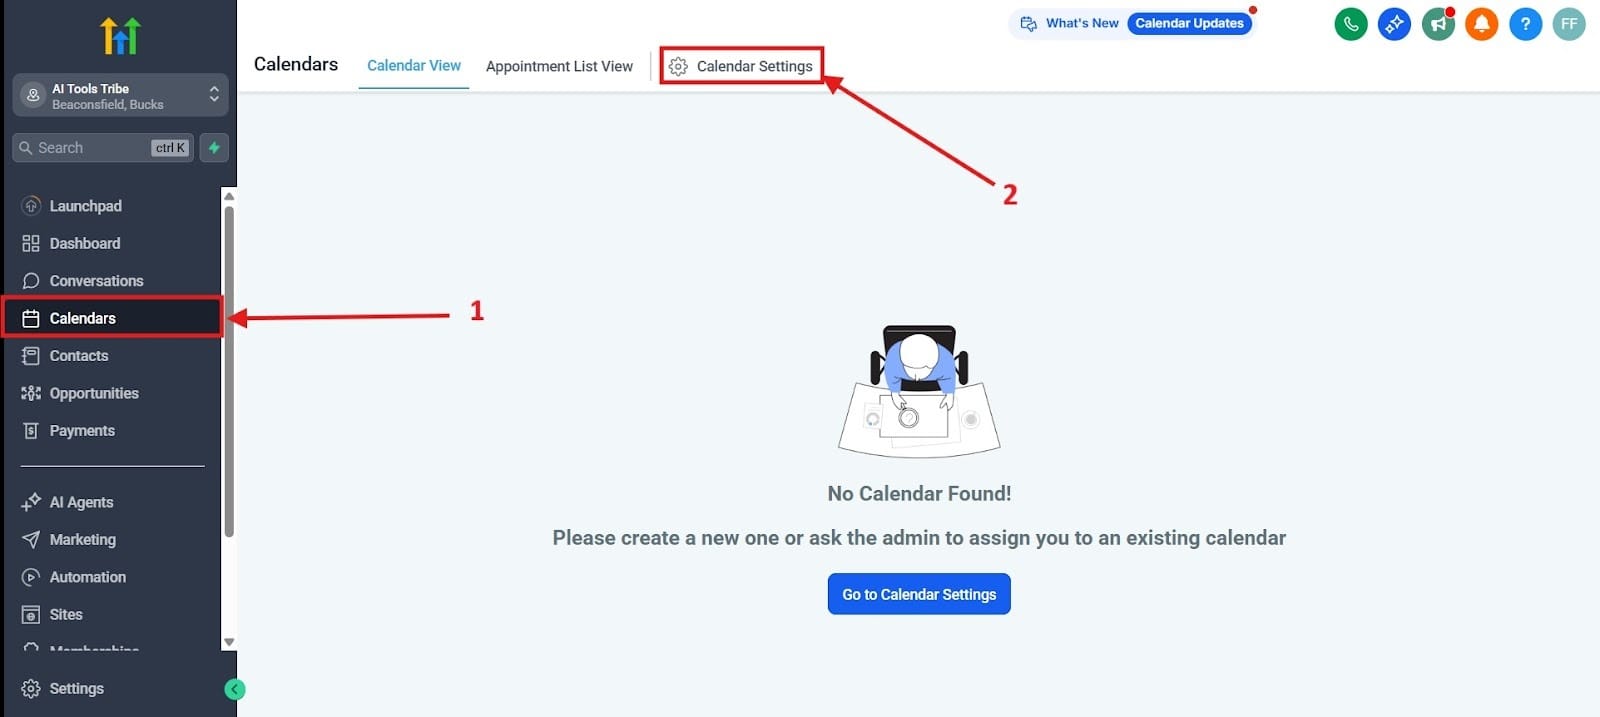
- Integrate Personal Calendar: First, go to Calendars and head over to your Calendar Settings. I outlined each step in red with step 1 and step 2.

From there you will scroll down to Integrations and connect your personal Google or Outlook account. GHL will read the busy slots from your personal calendar (e.g., doctor’s appointments, personal commitments) and simply hide those times from prospects, guaranteeing you are never double-booked. Again, I outlined each step in red with step 1 and step 2.

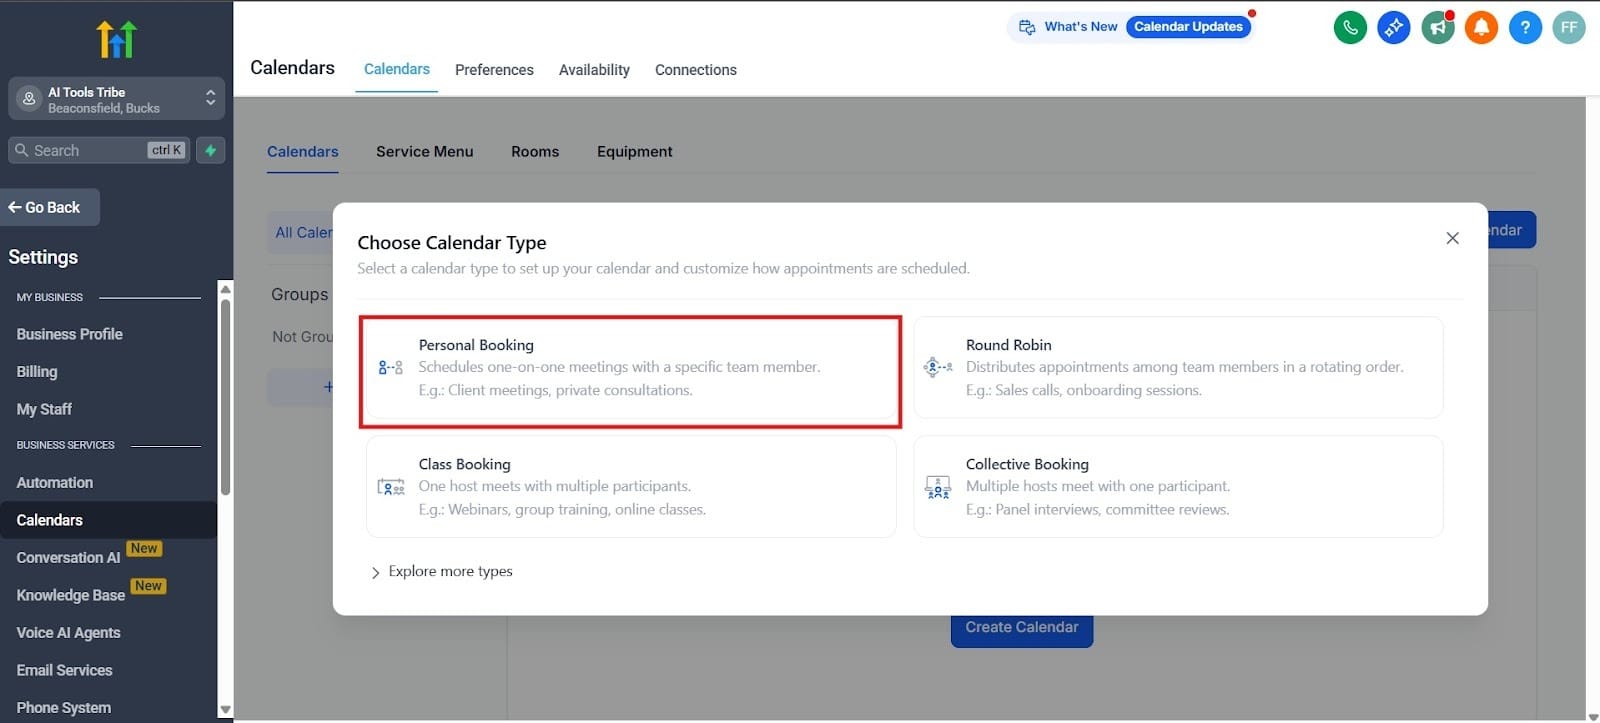
- Create and Link Calendar: Go to the Calendars tab, and enter the Calendar Settings, clicking the Create Calendar found in the center.
For a solopreneur and since you want to create one-on-one meetings, hit the button for Personal Booking. I highlighted this below. Once created, link your integrated personal calendar to be checked for double bookings.
By setting up this foundation, you establish your availability and ensure you never get double-booked. This saves you administrative hours and provides a reliable booking experience for your prospects.
Step 2: Pre-Call Lead Qualification with Custom Forms
GoHighLevel lets you customize the form your prospect sees before they complete the booking. Unlike simple external schedulers, this lets you qualify your leads before the call to increase your conversion rate and get the clients you truly want. The qualification data is automatically stored in the prospect's GHL Contact Profile.
Adding Custom Qualification Fields
- Access Form Settings: Go to the Form/Funnel tab, which you’ll find at the sites area. I highlighted the important points in the red boxes in the image below. Step 1 is where you navigate to forms. In step 2, you only click this if you want, but it will help you to create a funnel. For step 3, you click on Forms and from there, you dropdown to Builders.

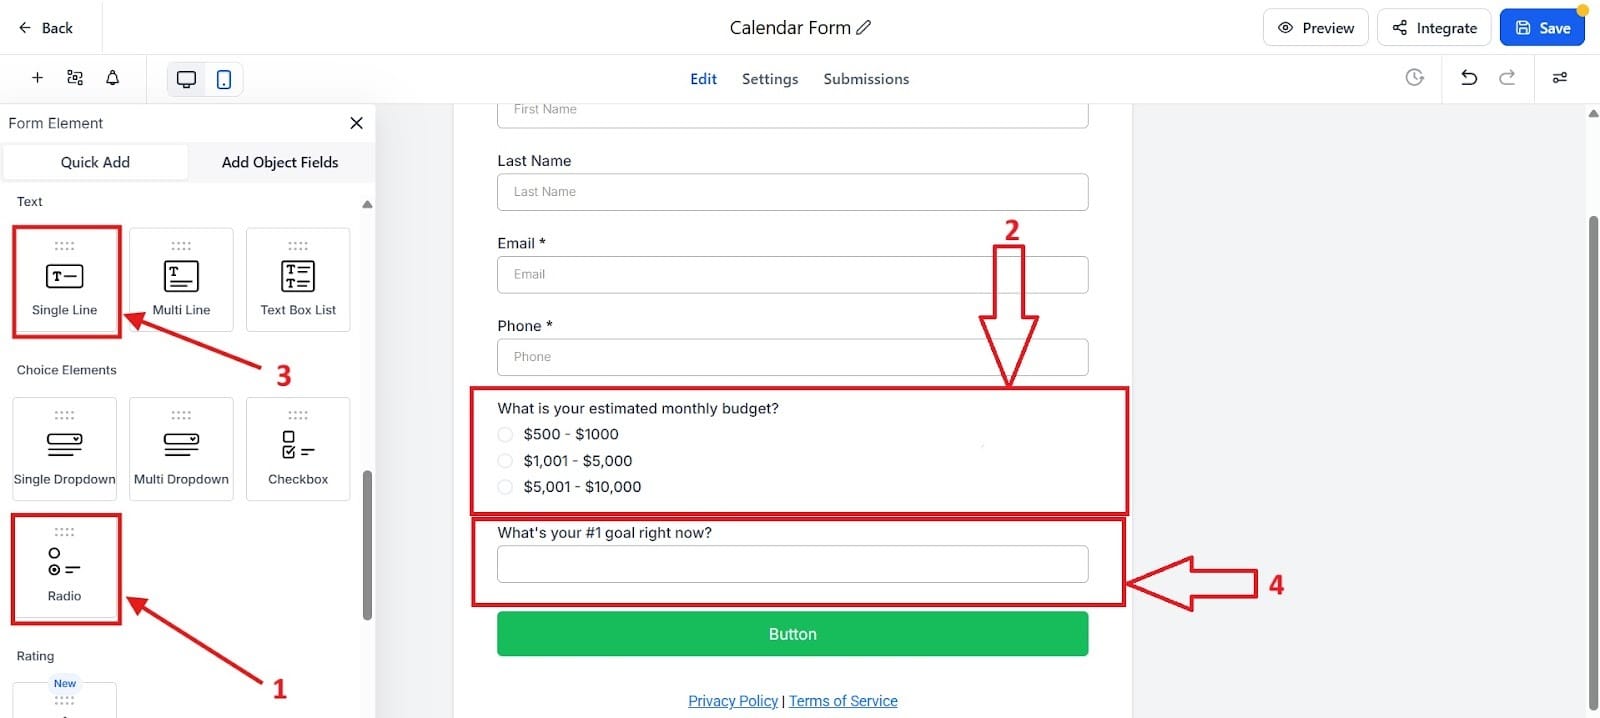
- Add Custom Fields: Beyond the standard Name and Email fields, click the part that says Add Field. You can integrate Custom Fields that matter to your sale, such as "What is your estimated monthly budget?" (Radio) I highlighted this in the red box 1. Go to red box 2 and fill out your options. You can also do "What's your #1 goal right now?" (Single Line). I highlighted this in red box 3, and red box 4 is where you would drag it.
By having prospects answer key questions ahead of time, you start the call prepared and ready to close the sale. This feature enhances efficiency by ensuring you only spend time on qualified, prepared calls, maximizing your selling time.
Step 3: The "No-Show" Killer: Automated Reminders
GoHighLevel’s integrated reminder system acts as your most powerful defense against no-shows, sending them reminders. It seamlessly utilizes both email and SMS text messages to keep the appointment consistently top-of-mind with your clients.
Setting Up The Golden Reminder Sequence
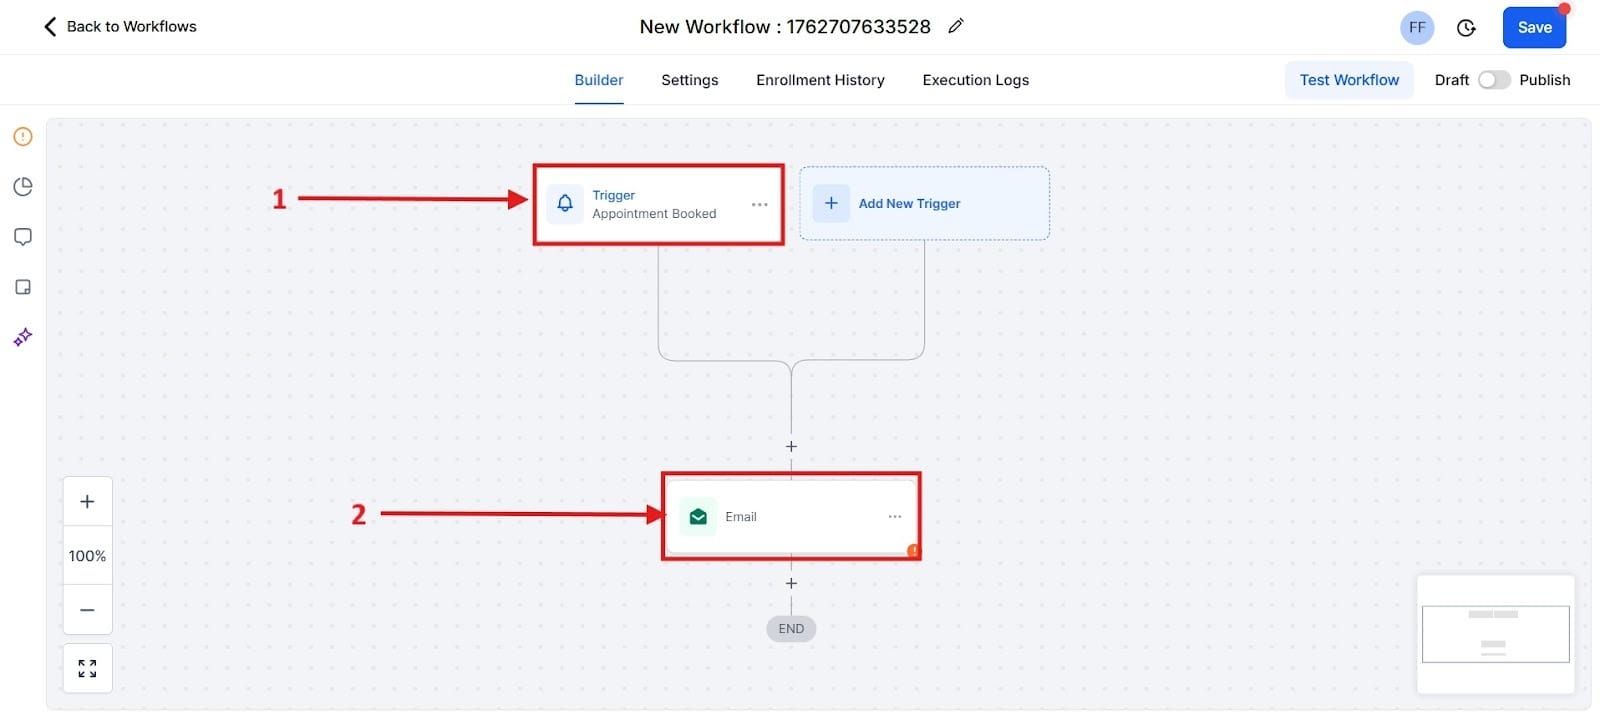
- Instant Confirmation: Go to the Automated tab found in the left hand side bar. Next, you will create a workflow triggered by the action “Appointment Booked.” Then, you'll send an email with the desired message to confirm the appointment. You can see this below in red box 1 and red box 2.
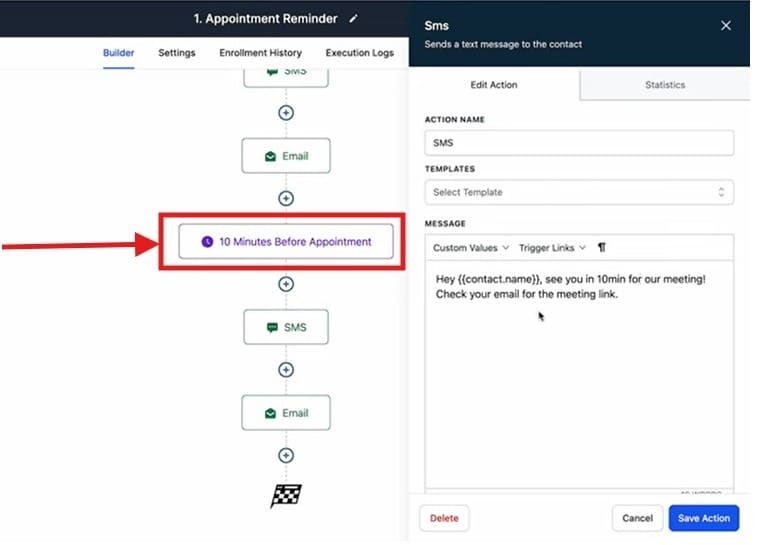
- Add Reminders: Scroll down to the Reminder Settings section.
- Reminder 1 (24 Hours Out): Add an Email reminder to be sent out 24 hours before your scheduled appointment. In the red box below, it shows 10 minutes, but you get the idea for how to change this out.
- Reminder 2 (1 Hour Out): Add an SMS reminder to be sent 1 hour before the appointment. The SMS reminder is a secret weapon because people will almost always read a text message.
Never Lose Revenue to Forgetfulness
You've done the hard work of getting a lead to book an appointment. This automated sequence ensures they show up, protecting your revenue and increasing your sales efficiency. By adding this simple step for sending out automatic reminders, you can realistically boost your show-up rates by 30% or more, directly increasing your closed sales.
Step 4: Pipeline Automation: The "Aha!" Moment
This is the essential step that connects your booking system to your organization system. GHL's native Workflows feature allows you to use the Appointment event as a Trigger to automatically perform an Action on your sales pipeline. You should never have to manually move a contact after they book.
How to Verify Your System
- Test the Live Funnel: Open your live calendar link in an incognito window and book an appointment yourself. Add in your first name, last name, and email just like if you were a customer yourself.
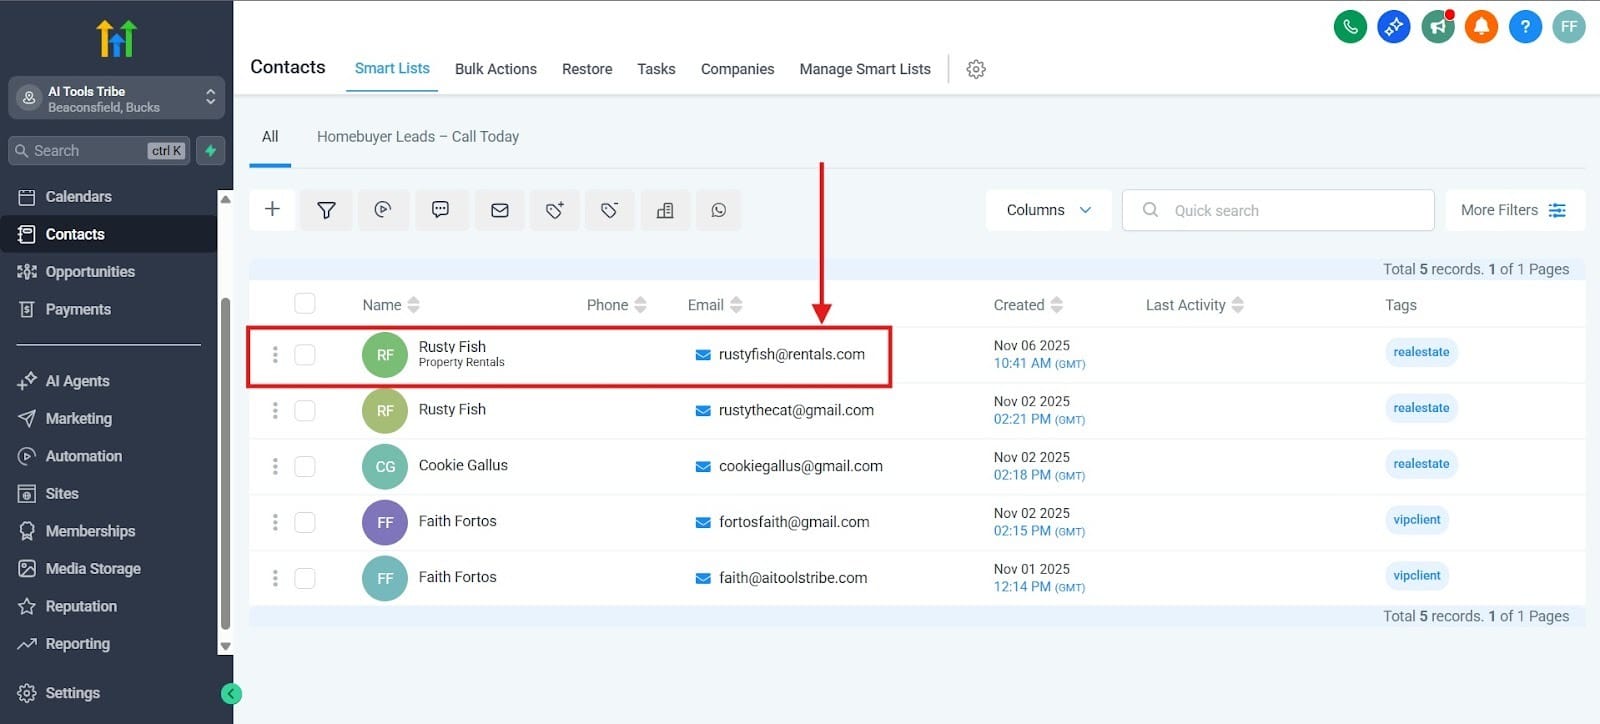
- Check the Contacts List: Head over to the Contacts tab in the main GHL menu. You should see your test submission at the top of the list. In the case here, it added the person entered right at the top of the page, so the Live Funnel worked in this case.
- Automating the Pipeline Move: Because the booking event instantly creates a contact record, your next step is to use that event to trigger a Workflow.
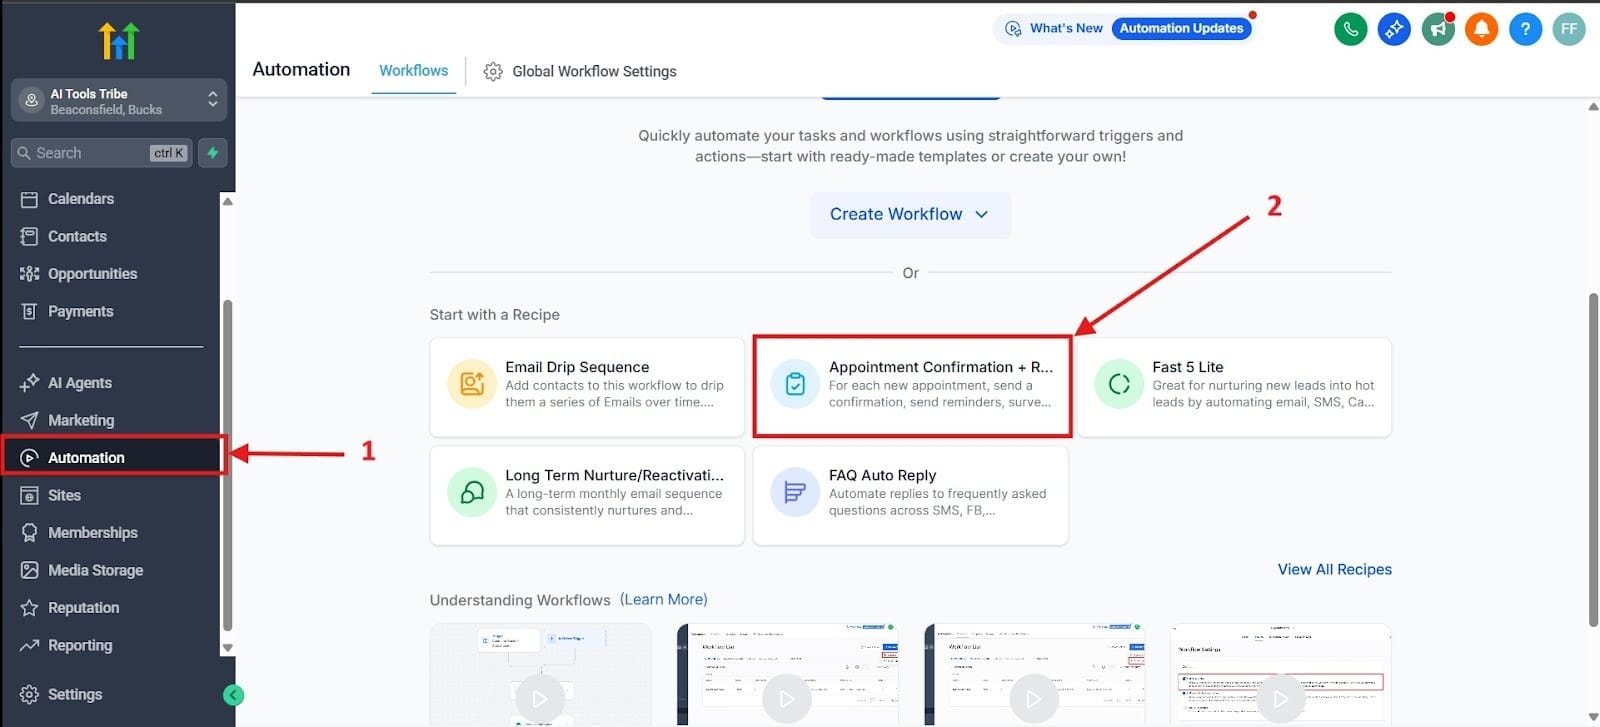
- Create Workflow: Go to the Automation (Workflows) tab and create a new workflow, which is highlighted in red as box 1. In this case, I would simply go with the Appointment Confirmation in the Recipe tab, which I highlighted in the red box as number 2.
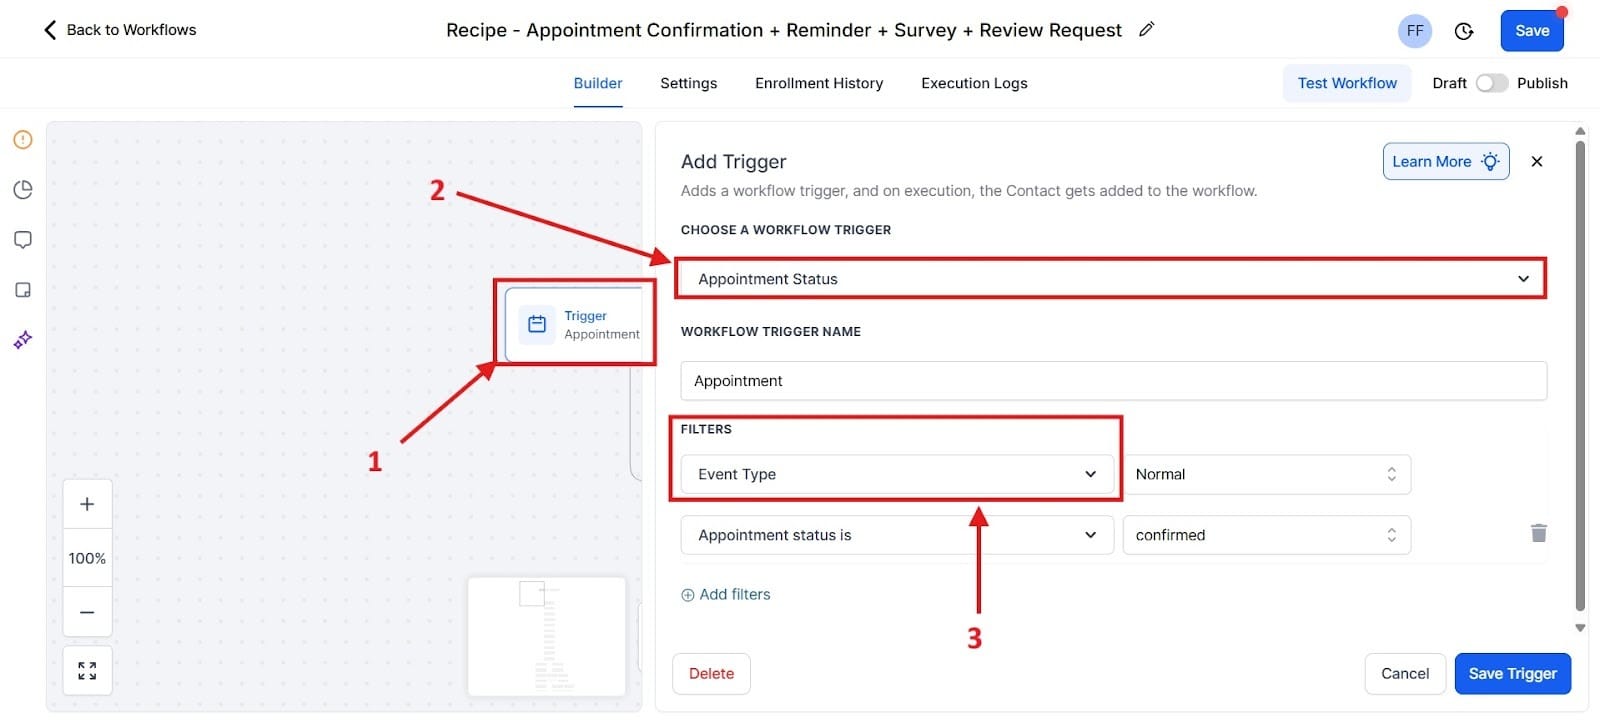
- Set Trigger: Click Add Trigger and select Appointment. Set the filter to In Calendar: [Select the specific calendar you just built].
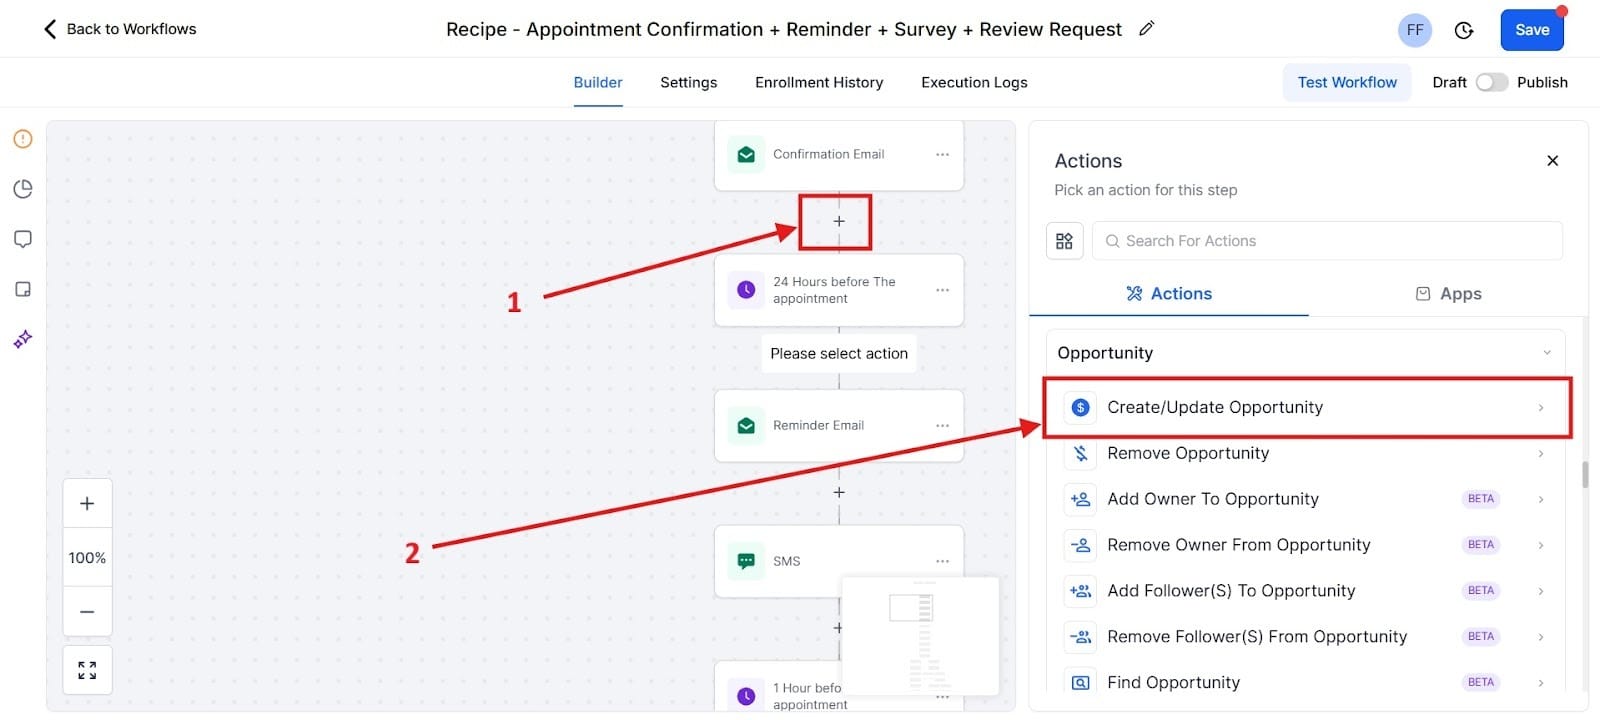
- Set Action: Click the + to add an action and then scroll down (it’s quite a ways down to get to this point, about halfway) hit the button that says “Add/Update Opportunity.”
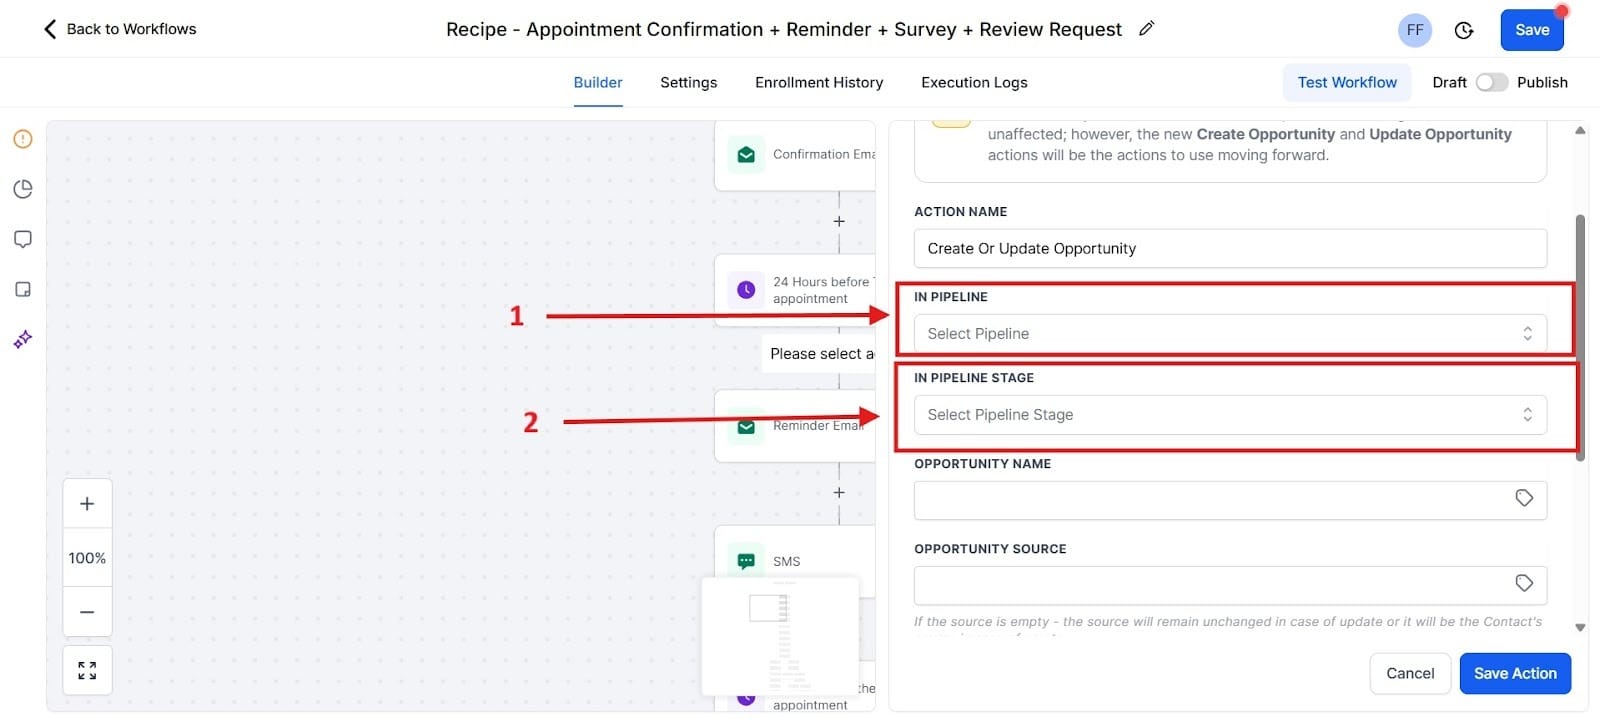
- Configure Action: Choose the correct pipeline and select the corresponding stage (e.g., Appointment Booked).
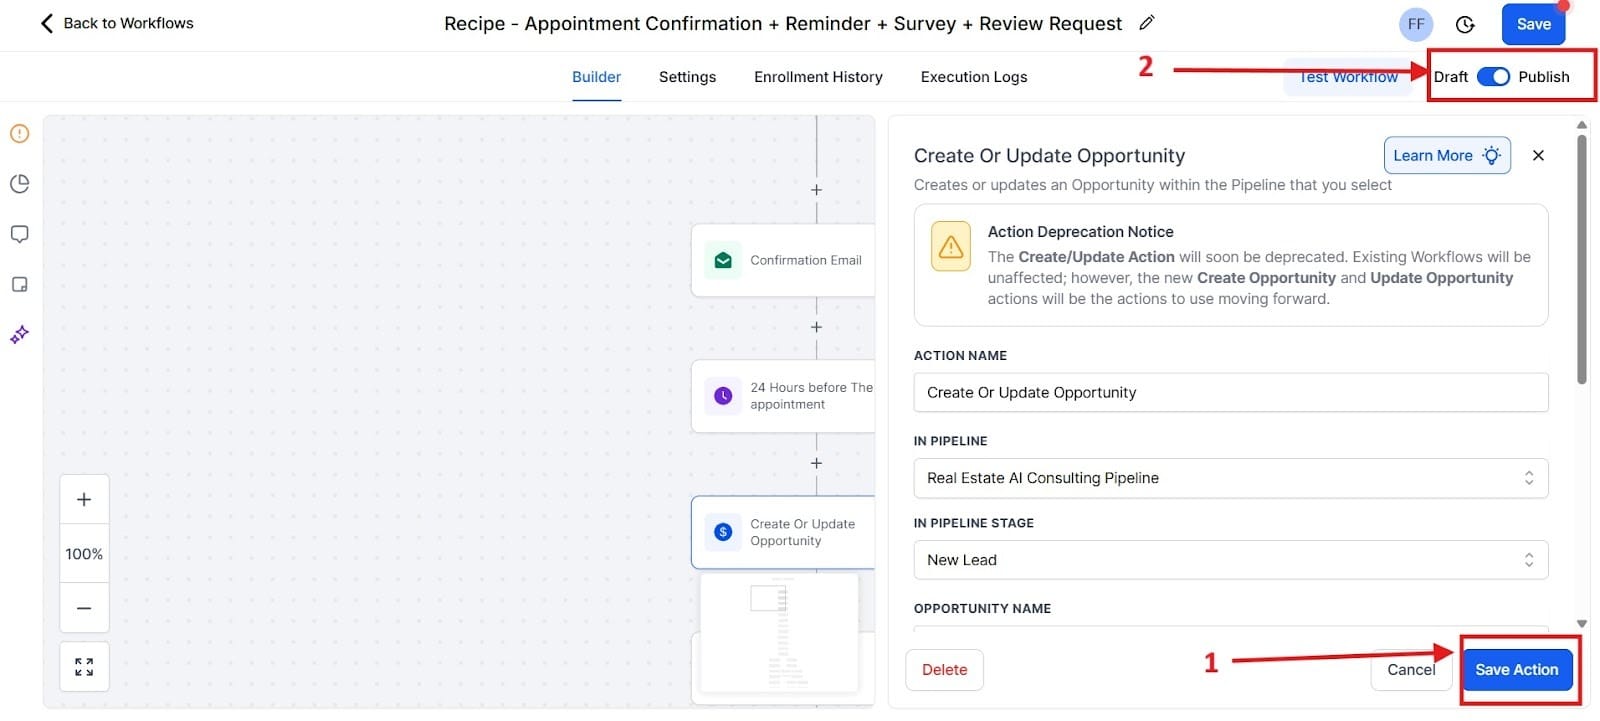
- Publish: Hit Save and Publish for this simple, two-step workflow. You’ll find the Save Action at the bottom, which I highlighted in the red box as Step 1. For Step 2, you would hit the Publish button taking it from draft over into Published, highlighted as a red 2.
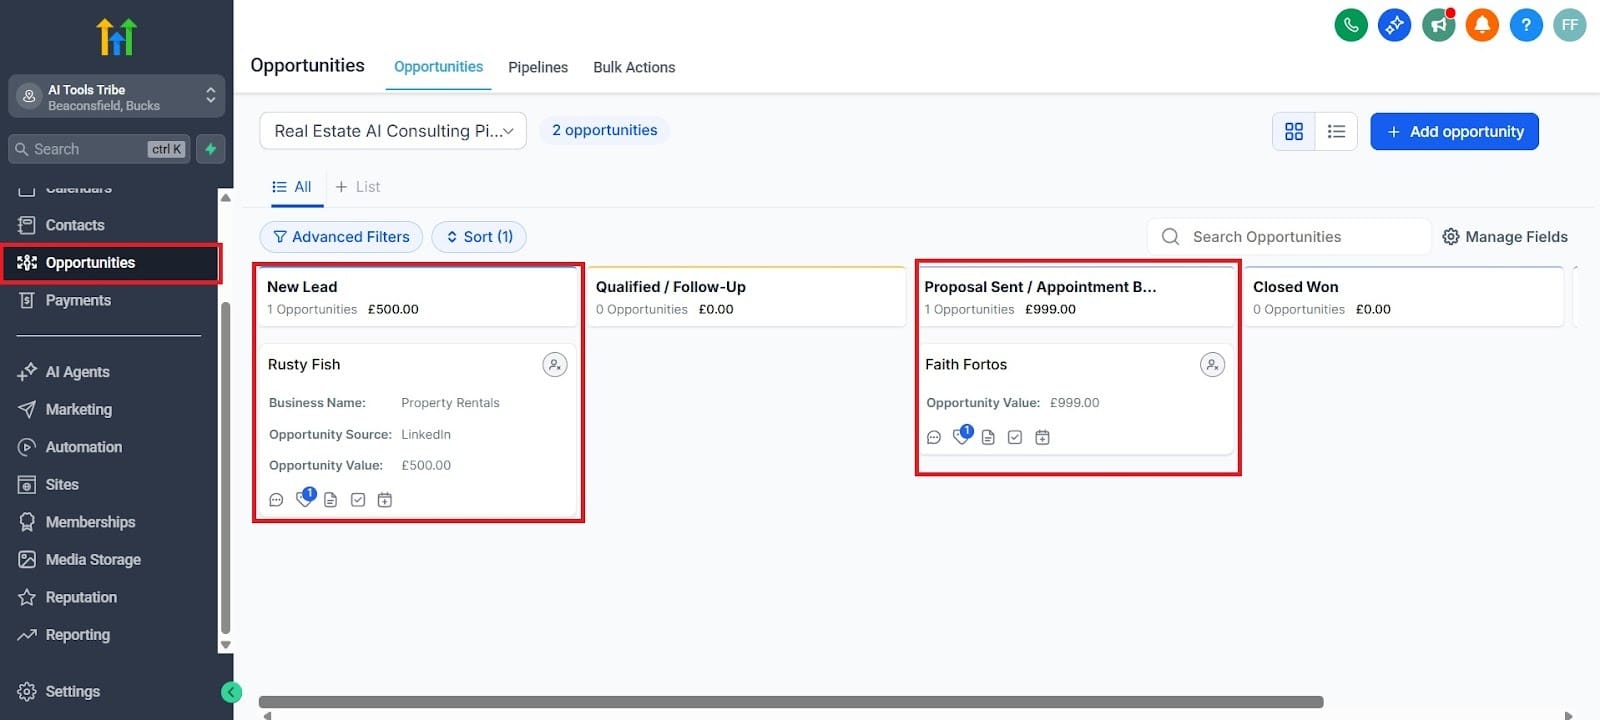
- Visualize the Journey (Future Planning): This section will allow you to track your clients and what stage of the journey they’re currently in. Go to Opportunities on the left hand menu. The moment a prospect books a call, GHL automatically moves their Opportunity Card to the correct stage, such as Appointment Booked, in your sales pipeline. This is one of the cool things about GHL, and it’s incredibly easy to work with. I’ve highlighted in red boxes the stages and the customers at what stage they’re in.
Conclusion: Never Manually Schedule Again
You've just built a system that replaces the need for an external scheduler, eliminated the tedious "email ping-pong," drastically reduced no-shows with automated SMS reminders, and fully integrated your booking system with your sales pipeline. You've consolidated three separate tools (scheduler, CRM, integrator) into one powerful, automated GHL feature.
However, you still have other manual communication tasks, like nurturing a lead who hasn't booked or following up after you send a proposal.
Next article, we’ll dive deep into the heart of GHL’s automation: Workflows. We’ll show you the three essential automation sequences every solopreneur needs to build to save 10+ hours a week and fully automate their follow-up marketing.
Check Out The Other GoHighlevel (GHL) Articles:
What is GoHighLevel?
Stop Losing Leads: How to Build Your First High-Converting Lead Magnet Funnel in GHL