If you’re a solopreneur or small or medium business owner, you know the value of a free offer—an eBook, a checklist, a free consultation—to attract qualified prospects.
But let's be honest: your current setup is probably a nightmare. It's a confusing, tangled web of disconnected tools, including a dedicated page builder, a separate form tool, a standalone CRM, and an integration tool (like Zapier) just to make them all talk to each other.
This setup is complex, expensive, and, worst of all, it’s painfully slow. When your funnel is slow to process a new lead and shift data from one software to the next, your follow-up is slow, and you lose revenue. You don't just lose a lead; you lose the long-term customer relationship and stability that customer may have brought you.
Feature: Unified Platform (Landing Page Builder, Form Tool, and CRM Combined)
That's where GoHighLevel (GHL) steps in. Instead of juggling five different subscriptions, GHL unites all the necessary components—the landing page, the lead form, and the CRM—into one single platform to dramatically simplify the entire process.
Benefits:
- Eliminate Complexity and Cost: You ditch the expensive subscriptions and confusing setup of multiple, disconnected software tools.
- Faster Funnels and Follow-up: Because all tools are natively combined, the setup is fast and seamless. GHL removes the friction, allowing you to follow up quickly and stop losing potential customers.
Practical Outcome:
By the end of this practical, step-by-step guide, you will have a live landing page, a functioning lead form, and an organized list of new contacts waiting for follow-up in your GHL CRM. You can have this entire system up and generating leads for you in less than an hour.
Step 1: How to Create Your Lead Capture Form
The lead form is the single most important part of your funnel. It serves as the gatekeeper to convert a website visitor into a customer of your products and services. For that reason, we want to design it for the highest conversion rate while simultaneously ensuring it gives the GHL system the data needed to automate all future follow-ups.
Laying the Foundation — How to Build the Form
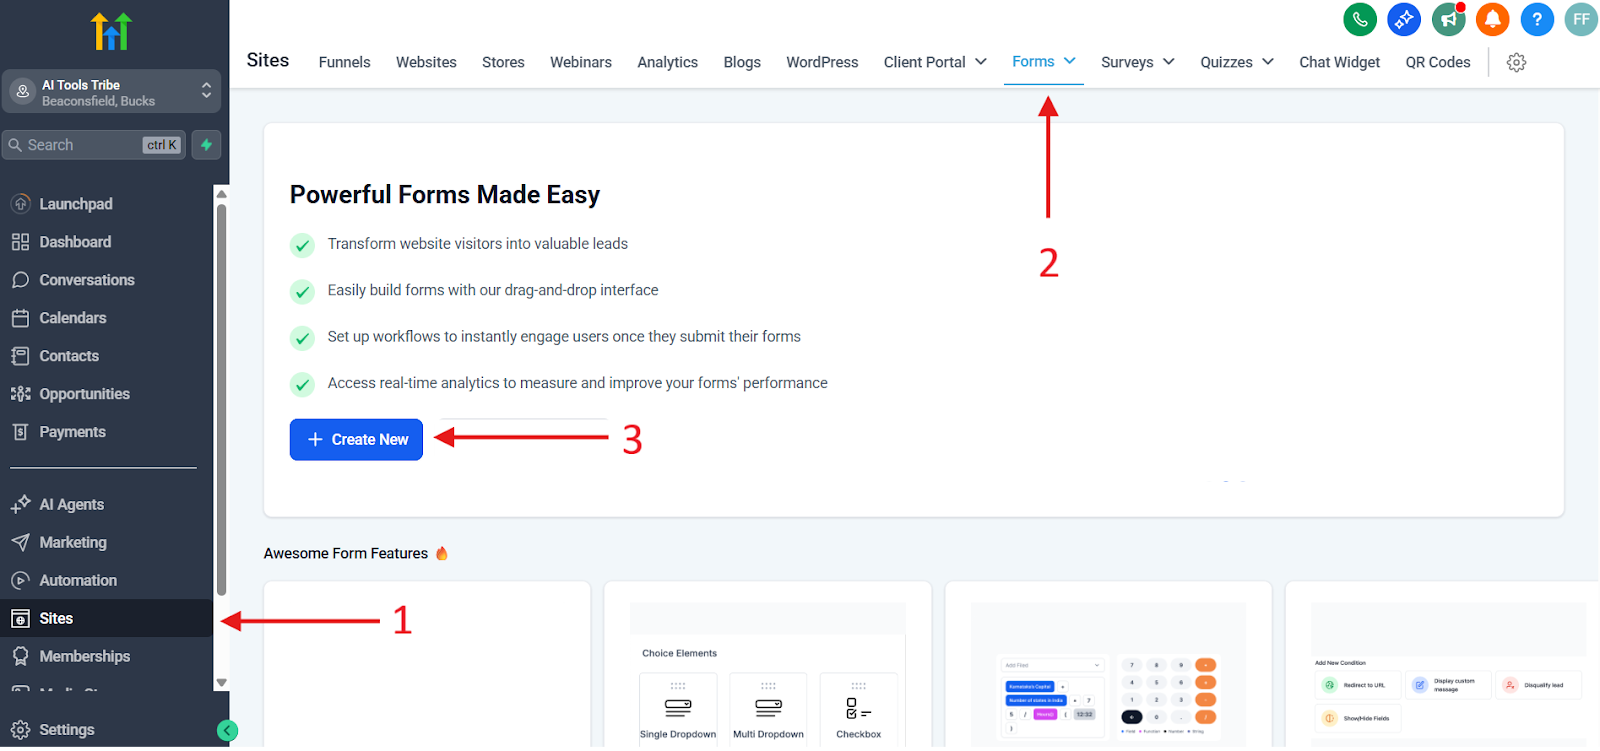
- Head over to the Form Builder: In your GHL dashboard, locate the Sites tab in the main interface and select Forms. Hit the “Create New” button to launch the drag-and-drop builder.
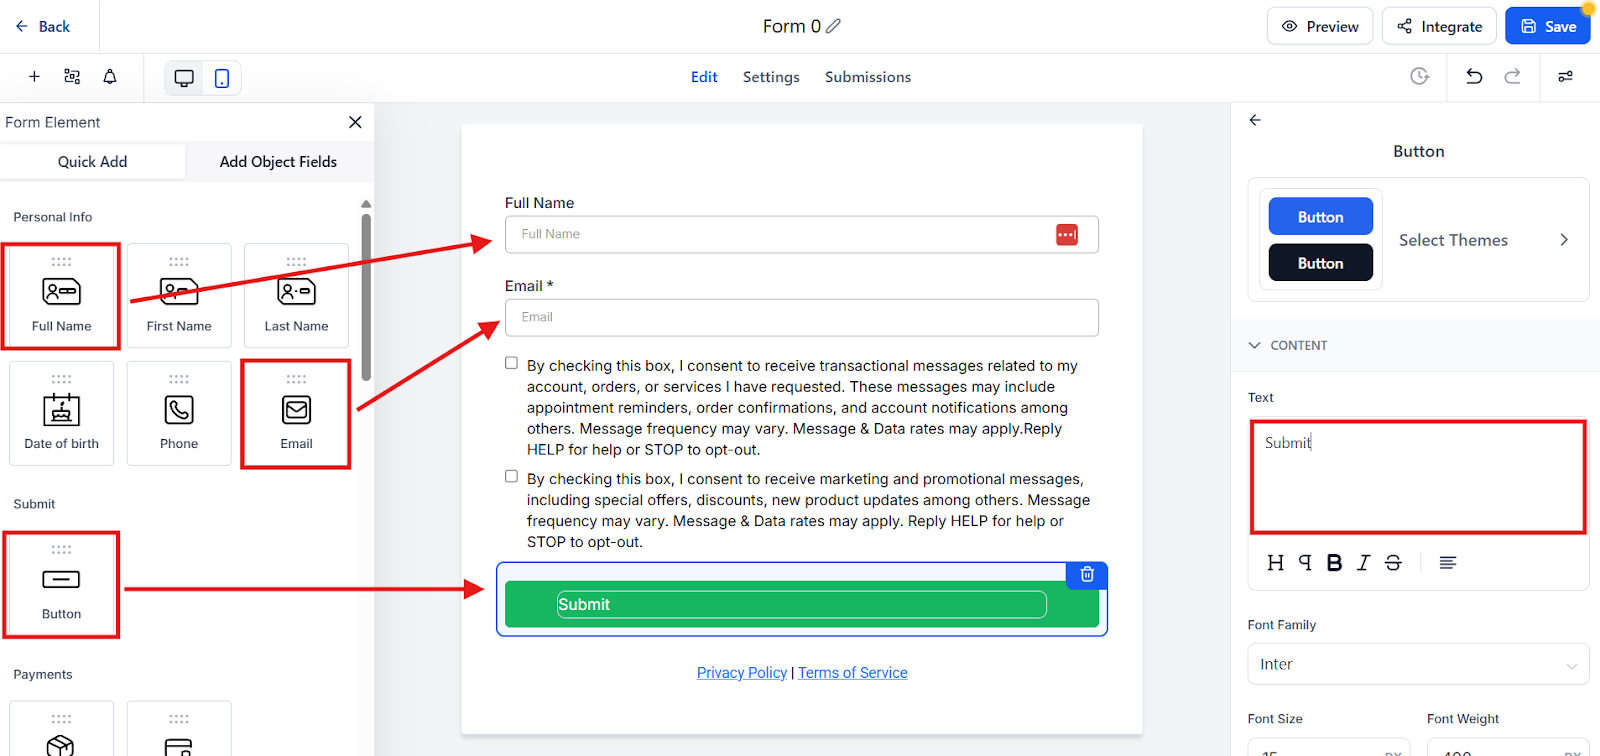
- Design for Speed (Minimal Friction): Remember the cardinal rule is less friction equals a higher conversion rate. When you build a basic lead magnet, only ask for the minimum information needed.
- Drag the Full Name field onto the canvas.
- Drag the Email field onto the canvas.
- Pro Tip: If your business model depends on text messaging to follow-up with customers, include the Phone field, but make it optional to keep friction low.
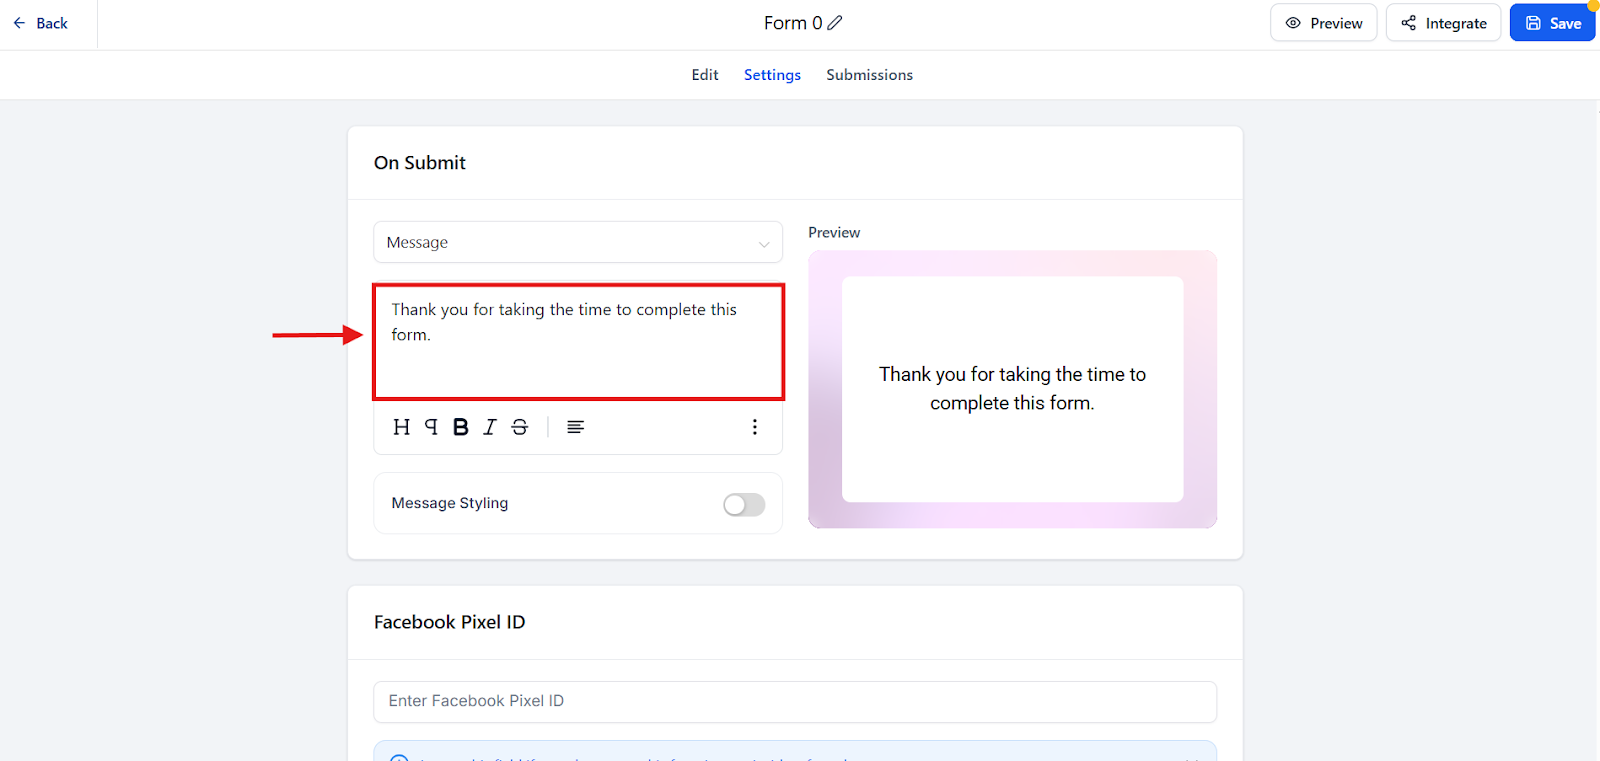
- Configure the Crucial Redirect (Options Tab): After a lead hits the submit button, they should be taken immediately to your “Thank You” page.
- Hit the Options tab found at the top of the form builder.
- Change the "On Submit" action from "Message" to "Redirect to URL." You will need to come back and paste the “Thank You” page URL here after you complete Step 2.
- Pro Tip: You must set up this redirect. It keeps users from seeing a generic “Success” message and moves them straight to resource delivery.
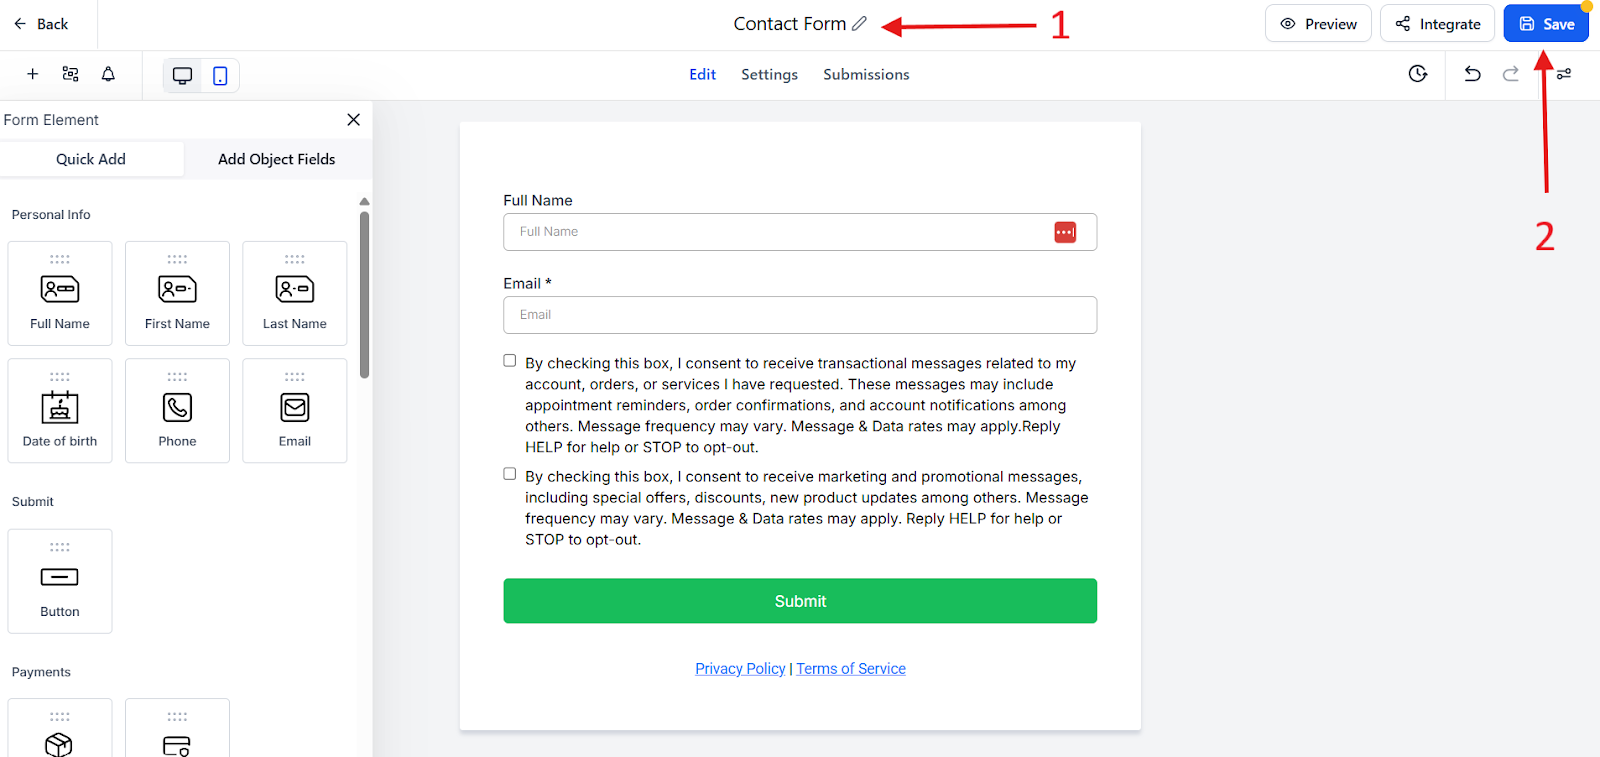
- Save and Name: Name your form something easy to remember (e.g., Contact Form) and click Save.
Step 2: The Visual Appeal – Building Your Funnel Pages
While a complete website is valuable, a funnel is superior for lead capture because it eliminates all distractions (like navigation menus or sidebars) and focuses the visitor on one single, necessary action, getting them to opt in. We need two simple pages:
- We need an Opt-In page.
- We need a Thank You page.
How to Guide: Build the Funnel
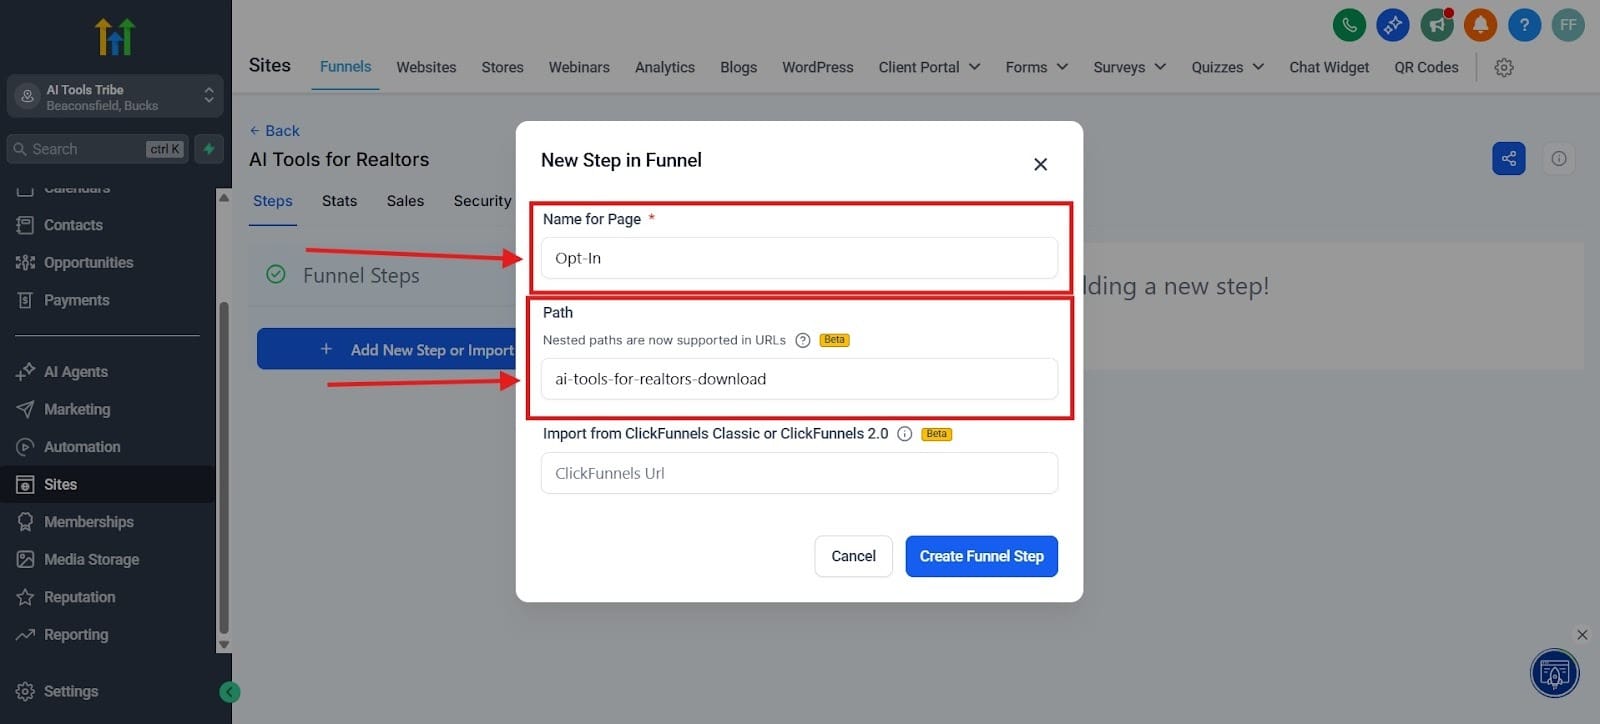
- Create a New Funnel: Return to the Sites tab and select Funnels. Click on “New Funnel.” Give it a clear name to reflect your offer (e.g., AI Tools for Realtors Funnel).

- Add the Opt-In Page Step:
- Inside your new funnel, click “Add New Step.” Name this step "Opt-In" and assign it a path (e.g., /ai-tools-for-realtors-download).
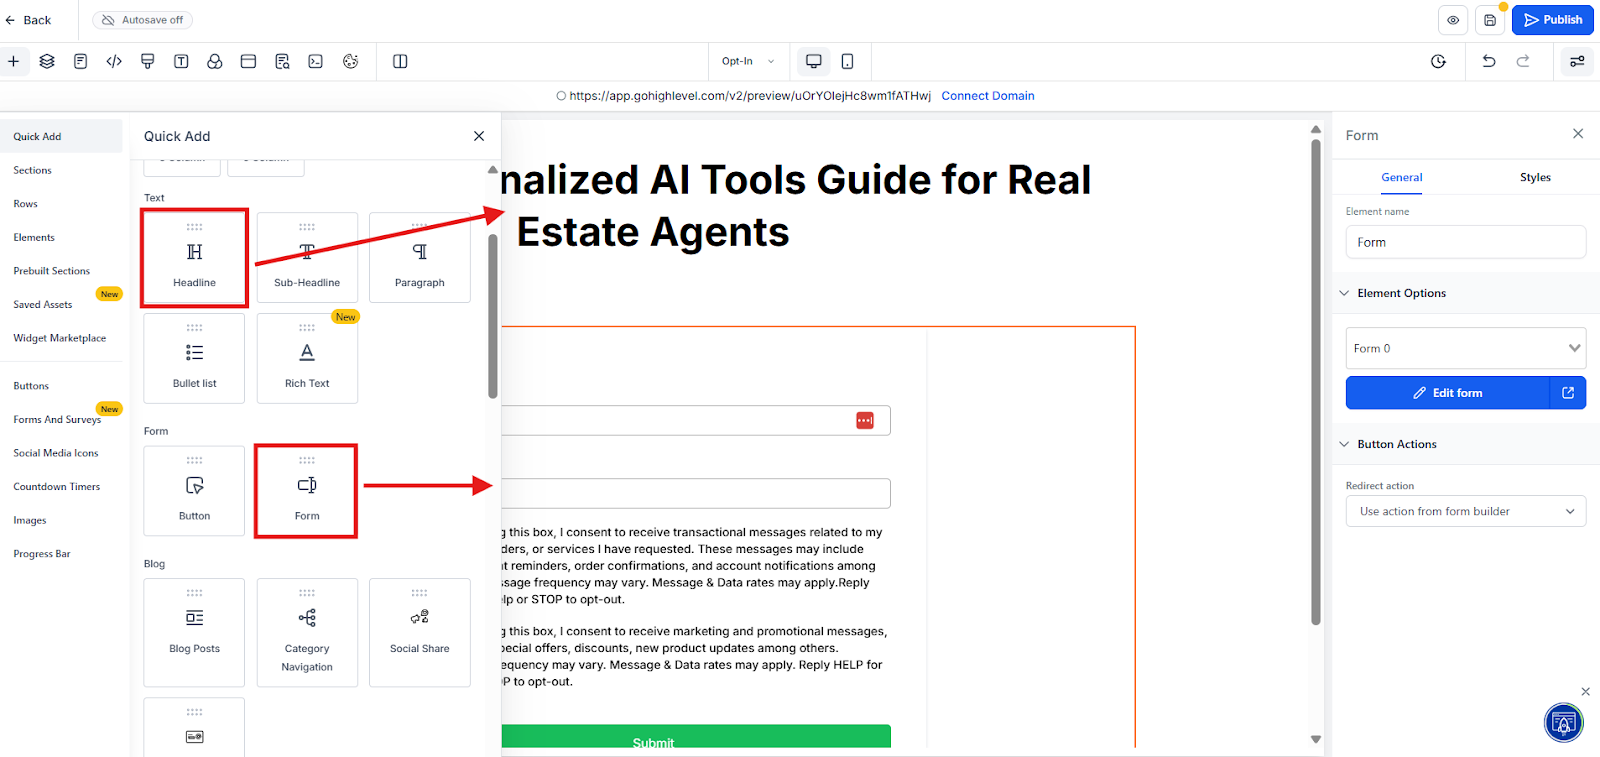
- Click the pencil icon to “Edit Page” and open the GHL Drag-and-Drop Editor.
- Pro-Tip: Start with one of GHL’s conversion-tested templates to minimize the time you spend designing.
- Customize the Opt-In Page: Your main goals here are clarity, visual appeal, and establishing trust.
- Headlines: Create a compelling headline with the Text Element that highlights the main benefits.
- The Form Embed: Use the Element Selector found on the left menu, choose the Form element, and select the "Contact Form" you created in Step 1.
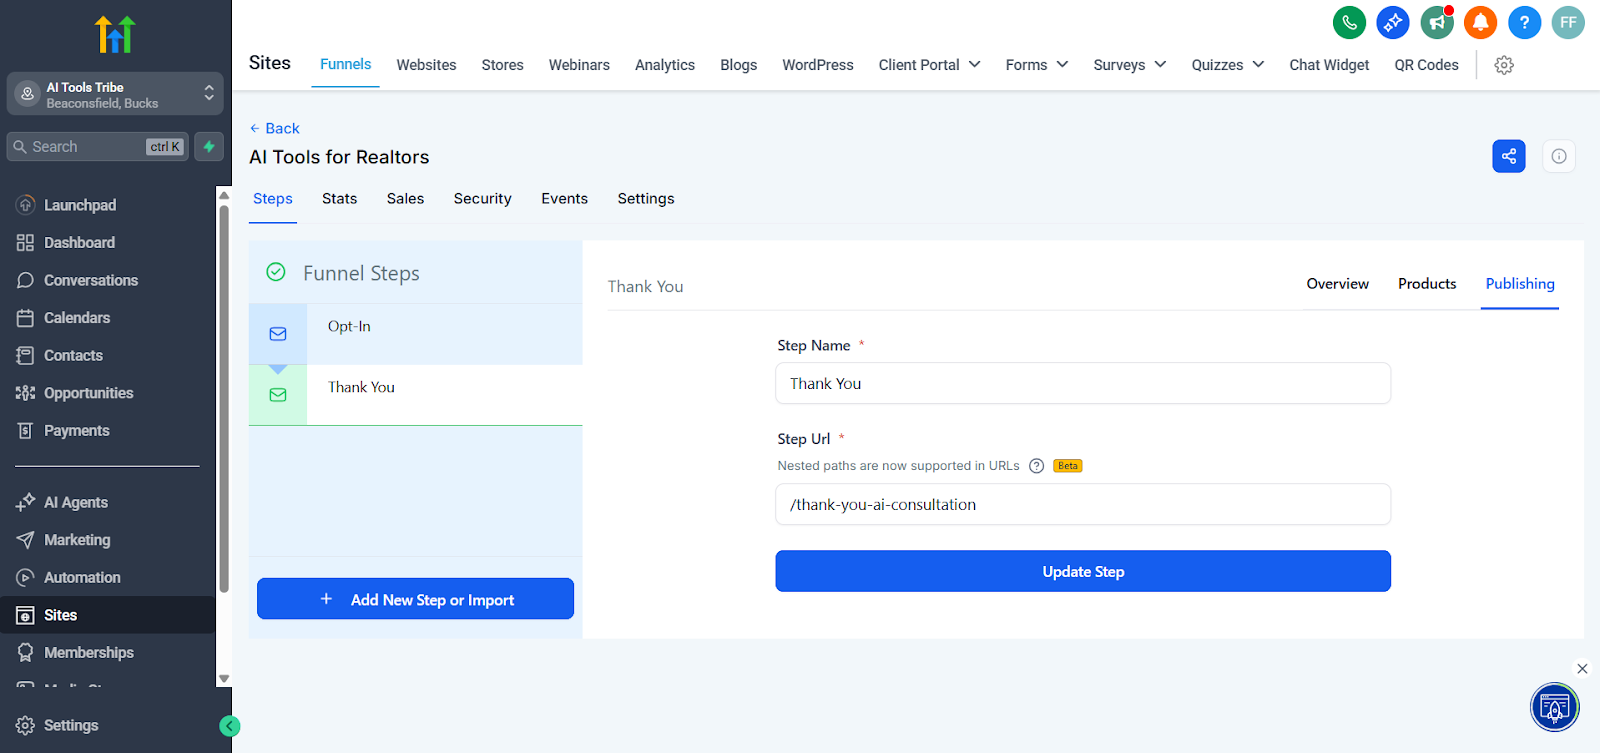
- Add the "Thank You” Page Step (Delivery):
- Go back to the Funnel Steps and hit the button “Add New Step.” Name it "Thank You" and give it a path (e.g., /thanks).
- Essential Step: Edit this page and include a confirmation message — e.g., “Your AI Tools Guide for Realtors is below! We’ve also sent a copy to your email.” The actual download link or embedded resource (like your PDF or calendar booking link for a consultation).
- Final Link: Copy the URL of this live Thank You page step and go back to Step 1 (the Form Builder) to paste it into the Redirect to URL field. Doing this will complete the loop.
Step 3: Integration – Getting Leads into Your CRM
With the form embedded and the redirect set up, your system is already technically live. Now you just have to verify where the valuable new leads will land and how GHL instantly organizes them for you.
How to Verify Your System
- Test the Live Funnel: From an incognito window, open your live opt-in page URL and fill out the form yourself. Hit submit and confirm that you were redirected immediately over to the “Thank You” page.
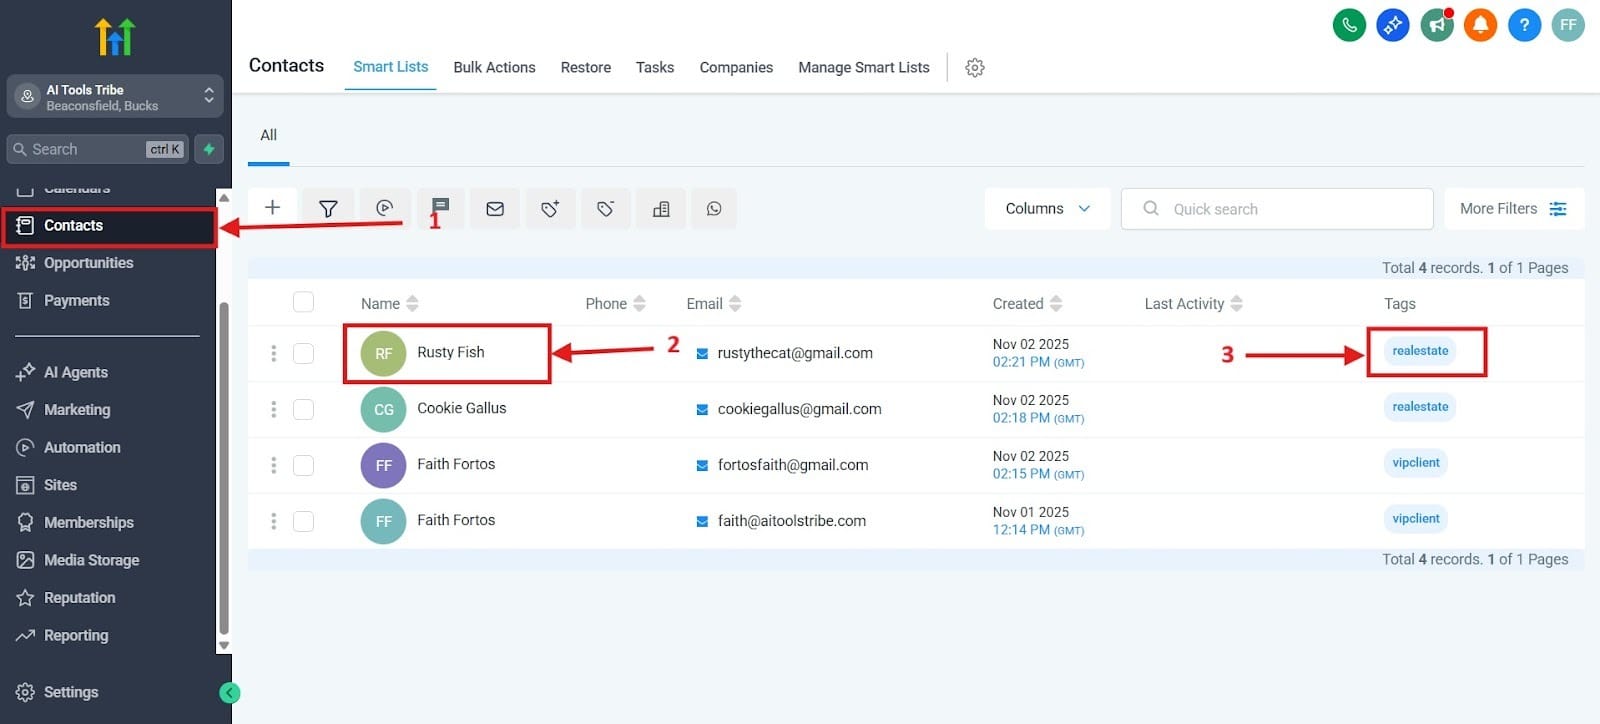
- Check the Contacts List: Head over to the Contacts tab in the main GHL menu. I highlighted this as a number 1 in the screenshot.
- At the top of the list, you should see your test submission. Every person added into your funnel will be entered into the contacts section automatically. I highlighted this point as number 2.
- On the right side of the list, you will see the Tag you assigned in Step 1 (e.g., NewLead-Contacts-Form) instantly applied. This confirms that your form-to-CRM connection is working fine. I highlighted this as number 3 with the red arrow.
- Visualize the Journey (Future Planning): For now, your lead is in the main Contacts list. However, GHL gives you a visual dashboard to manage their journey.
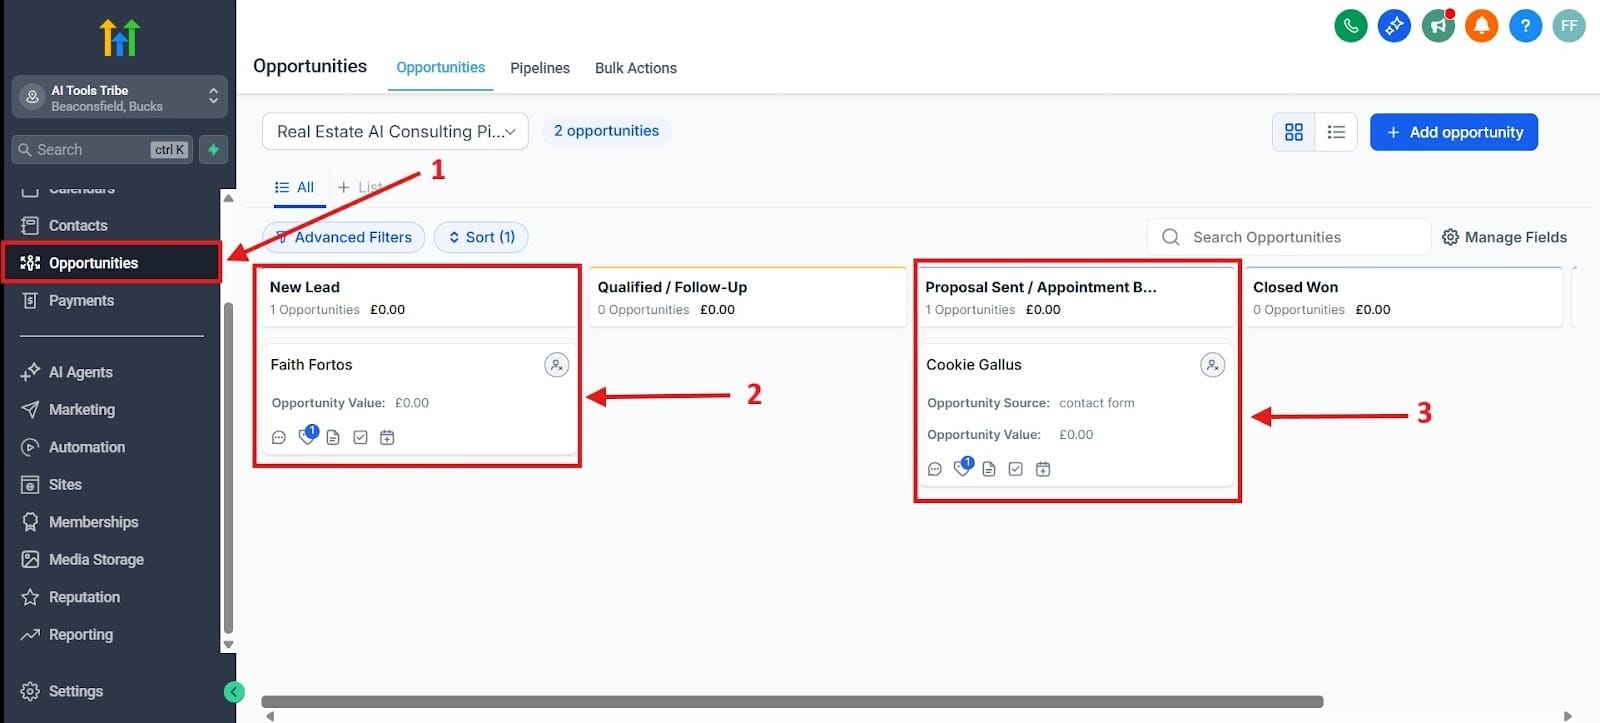
- Navigate to the Opportunities tab. You’ll see that I highlighted this point as number 1. This will take you to a section where you will see your leads in various stages of the journey and where they’re currently at in your pipeline.
- Because the lead is tagged, your next step will be creating a simple Workflow that automatically moves the lead from the Contacts list into the first stage of the Opportunities Pipeline (e.g., "New Lead"). You see I highlighted where the contact is in the pipeline. In number 2, you see a new lead who has just entered into the pipeline.
- In arrow number 3, you see that the appointment has been booked and the proposal was sent. Hopefully this helps you to understand and visualize how the Opportunities section works in GHL.
Conclusion: What to Do With Your New Leads
At this point, you’ve successfully launched a complete, lead-capturing machine, which includes a high-converting funnel, a smart form, and a perfectly integrated CRM record in GHL. You’ve saved money, eliminated integration headaches, and now have a reliable, automated system for capturing new prospects.
Your next step is to follow up immediately while they are hot! In the next GHL article we’ll show you exactly how to set up an automated Email and SMS Nurture Sequence to turn that tagged lead into a booked consultation or a paying customer (using that exact tag you created today!).