You’ve dedicated time to building the most important components of your GHL system like the lead capture Forms, the visual Pipelines, the easy Calendars, and the instant Chat.
However, even with all those great tools, manually managing the handoffs between them is still draining your time. You still have to remember to send the confirmation email, manually move the lead’s card into a new stage, and schedule a follow-up three days later. Unfortunately, human memory is not perfect, and the moment a lead gets forgotten, they are lost forever.
This is the moment we turn your well-organized pieces into a self-operating machine.
The GoHighLevel Workflows feature is the central intelligence unit of the entire platform. Workflows are visual automation builders that operate on simple, predictable logic.
Workflows will ensure 100% consistency in your lead follow-up.
Here's a quick video walkthrough on how to automate your follow-up with GHL:
Feature: Understanding the Core Logic
You can build Workflows easily because they rely on three simple, customizable components. Before we build, let’s understand how the pieces come together.
The Trigger (The Start Button)
The Trigger is the initial event that launches the entire automated sequence. Without a trigger, the workflow remains dormant. Triggers are events happening to a contact record.
Common Trigger Examples:
- Form Submitted: The most common starting point like when a lead fills out your Ebook form, for example.
- Pipeline Stage Changed: When you manually drag a lead to a new sales stage (e.g., “Warm Lead”), an automated sequence can start.
- Booking Status: An appointment is confirmed, cancelled, or marked as a no-show.
- Tag Added: Used for internal segmentation (e.g., adding the tag “VIP” starts a special welcome sequence).
Actions (The To-Do List)
When the workflow executes in response to the trigger, this begins what’s known as the Actions. They control all communication, data management, and timing within the system.
The Big Four Workflow Actions (Your Primary Toolkit):
- Communication: Sending a Send Email or Send SMS instantly to the prospect.
- Internal Management: Sending an Internal Notification (via email or text) to notify you or a team member.
- Data Management: Updating the contact record by using Add Tag, Remove Tag, or Update Contact Field.
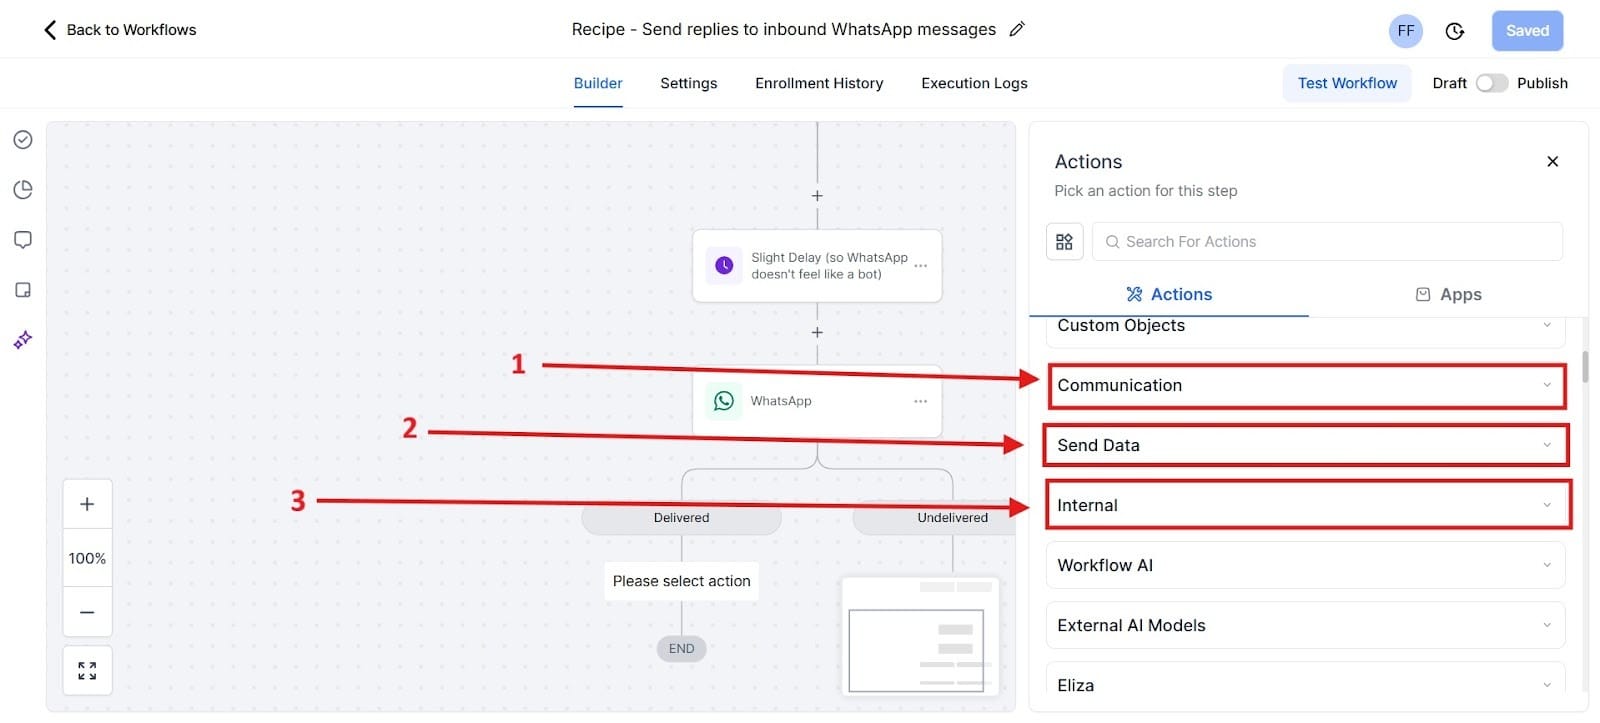
You’ll see three things highlighted in red. These are the actions that were highlighted above. Inside red box 1 are points of interest like sending an email, sending an SMS, and booking an appointment. In red box 2, there are only three points including Webhook, Custom Webhook, and Google Sheets. For red box 3, these are internal things happening with your business.
Wait Steps (The Pacing)
Wait Steps create strategic pauses in your follow-up sequence to avoid overwhelming the lead with a barrage of messages. Effective nurturing depends on strategic pacing:
- Wait for a Duration: Pausing the sequence for a specific time (e.g., Wait 2 Days).
- Wait for an Event: Pausing the sequence until the contact performs a required action (e.g., Wait until a Reply is received).
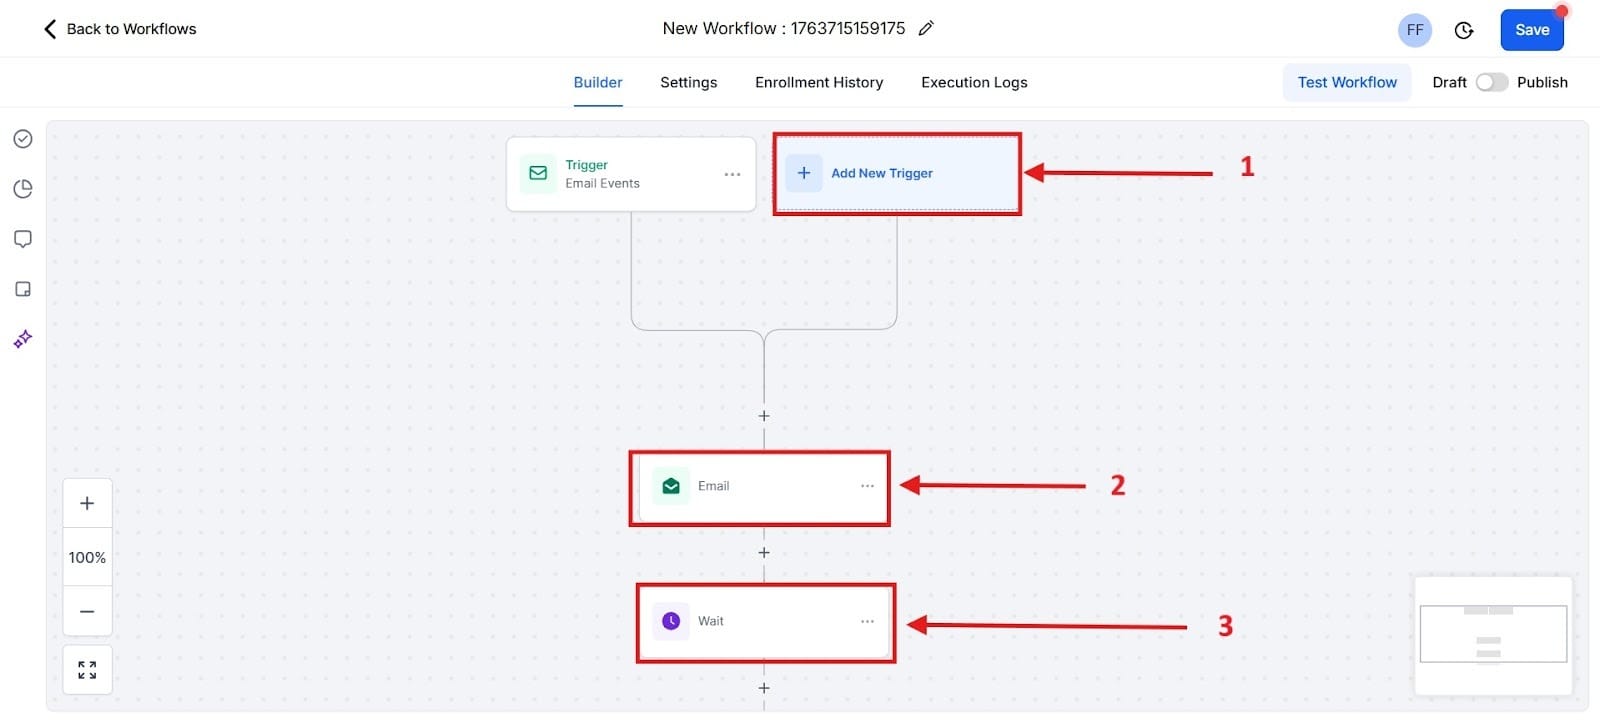
Below you see the first red box highlighted as number one where you can Add New Trigger. Highlighted as number 2 in the red box is where you can Email. In the number 3 red box, you can put a Wait on something that ranges anywhere from a few seconds to minutes or hours.
The Cornerstone Workflow: New Lead Nurturing
New Lead Nurturing is the single most important workflow for any solopreneur. It ensures that every new lead receives immediate confirmation and sustained, strategic follow-up, maximizing the chance of conversion before they forget who you are.
Workflow Name: New Website Lead Follow-Up
1. The Trigger: Form Submitted
This workflow begins the moment a prospect shows interest:
- Setup: Select the trigger type Form Submitted.
- Filter: Specify the exact form (e.g., Website Contact Form or the Ebook Download Form).
2. Action: Update Pipeline & Internal Tagging
The first actions are internal housekeeping to organize the lead instantly:
- Action 1 (Pipeline): Add the action Add/Update Opportunity. Set the stage to New Lead (or Attempting Contact) in your sales pipeline. This instantly moves the lead out of the general contacts list and onto your dedicated sales board, making them visible on your Kanban view.
- Action 2 (Tagging): Add the action Add Contact Tag. Use a tag like Source: Website Form. This allows you to segment this lead from others for later reporting and targeted outreach.
3. Action: Immediate Communication (Confirmation)
The goal here is velocity and instant acknowledgement on two channels:
- Action 3 (SMS - The Fastest Contact): Add the action Send SMS. Use an instant template that validates their action and opens the door to conversation:
- Template: "Thanks for reaching out! We received your inquiry and will be in touch shortly. In the meantime, check out our quick FAQ: [Link to FAQ]. Feel free to text any urgent questions here!"
- Action 4 (Email - The Formal Confirmation): Add the action Send Email. This email is slightly more formal, confirming receipt, providing your contact information, and perhaps setting an expectation for when you will follow up personally.
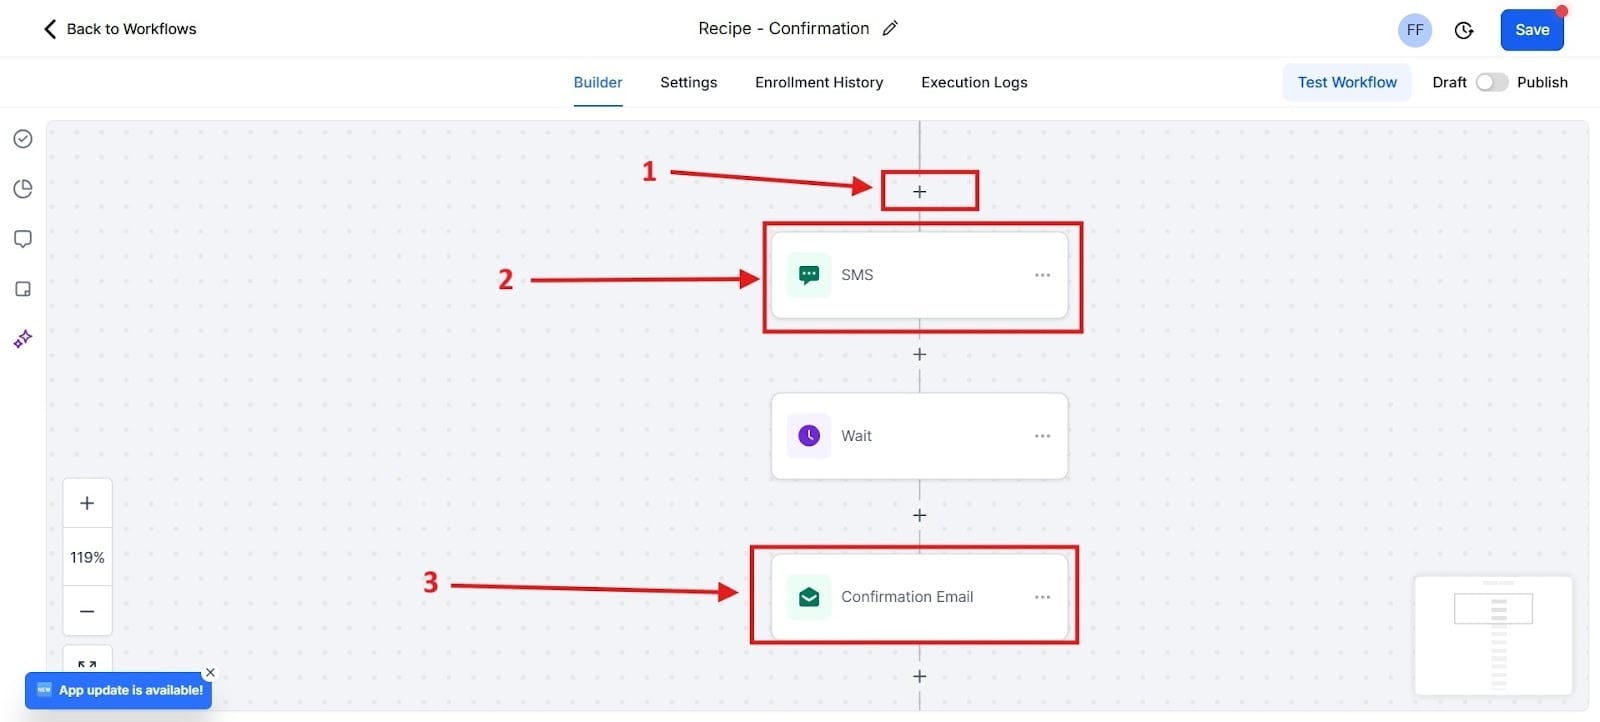
For the red box number 1, click the plus sign to create either the SMS or the email. For red box number 2, you see an SMS was created, followed by the waiting trigger. After that, red box number 3 is a confirmation email.
4. Wait Step (The Strategic Pause)
We don't want to look desperate:
- Action 5: Add the action Wait. Set the duration to Wait 1 Day. This pause is strategic; it gives the prospect a moment to breathe, check their email, and look at the FAQ link you sent.
5. Action: Sustained Nurturing (Adding Value)
Now, we follow up without being pushy. Your goal here is to just offer value:
- Action 6 (Email): Add the action Send Email. This email is pure value, not selling. Send a link to a relevant case study, a helpful guide, or a brief tip related to their likely problem. (E.g., "3 Things You Must Know Before Starting X Project.")
- Action 7 (Wait): Add the action Wait 2 Days.
- Action 8 (SMS - The Final Nudge): Add the action Send SMS. A final, gentle, personalized nudge to gauge their readiness:
- Template: "Just circling back to see if you had any questions about the guide I sent. Are you looking to tackle [Their Specific Problem] this week?"
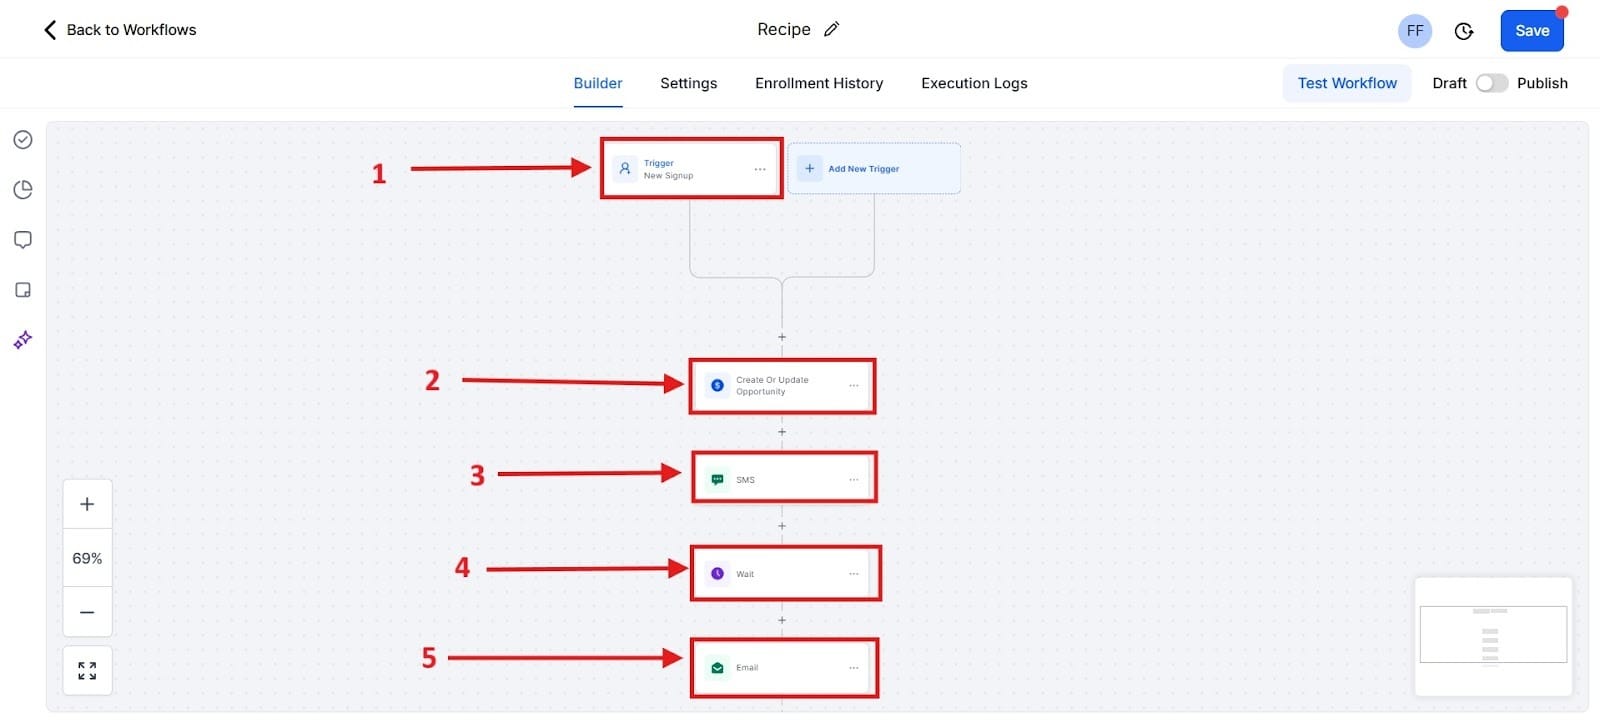
Here you see highlighted as a red number one as what happens when you get the customer to sign up. Highlighted as a red number 2 is where you would add a customer to your pipeline. After it does that, highlighted as the red number 3, you would send the customer an SMS text message. The red number 4 is where you would wait 1 day before following up with the red number 5 where you send the customer an email.
Automating Internal Sales Management
Workflows aren't just for communicating with leads, but they are essential for ensuring accountability in your sales process. This simple internal workflow ensures that no lead falls through the cracks simply because you forgot to send follow-up.
Workflow Name: Internal Follow-Up Nudge
1. The Trigger: Pipeline Stage Change
This trigger is based on inaction, which is basically a lead getting stuck:
- Setup: Select the trigger type Pipeline Stage Change.
- Filter: Specify the condition: Lead has been in Stage X (e.g., Warm Lead) for 3 days. This is a critical time limit you define for how long a lead can sit in a specific stage without being acted upon.
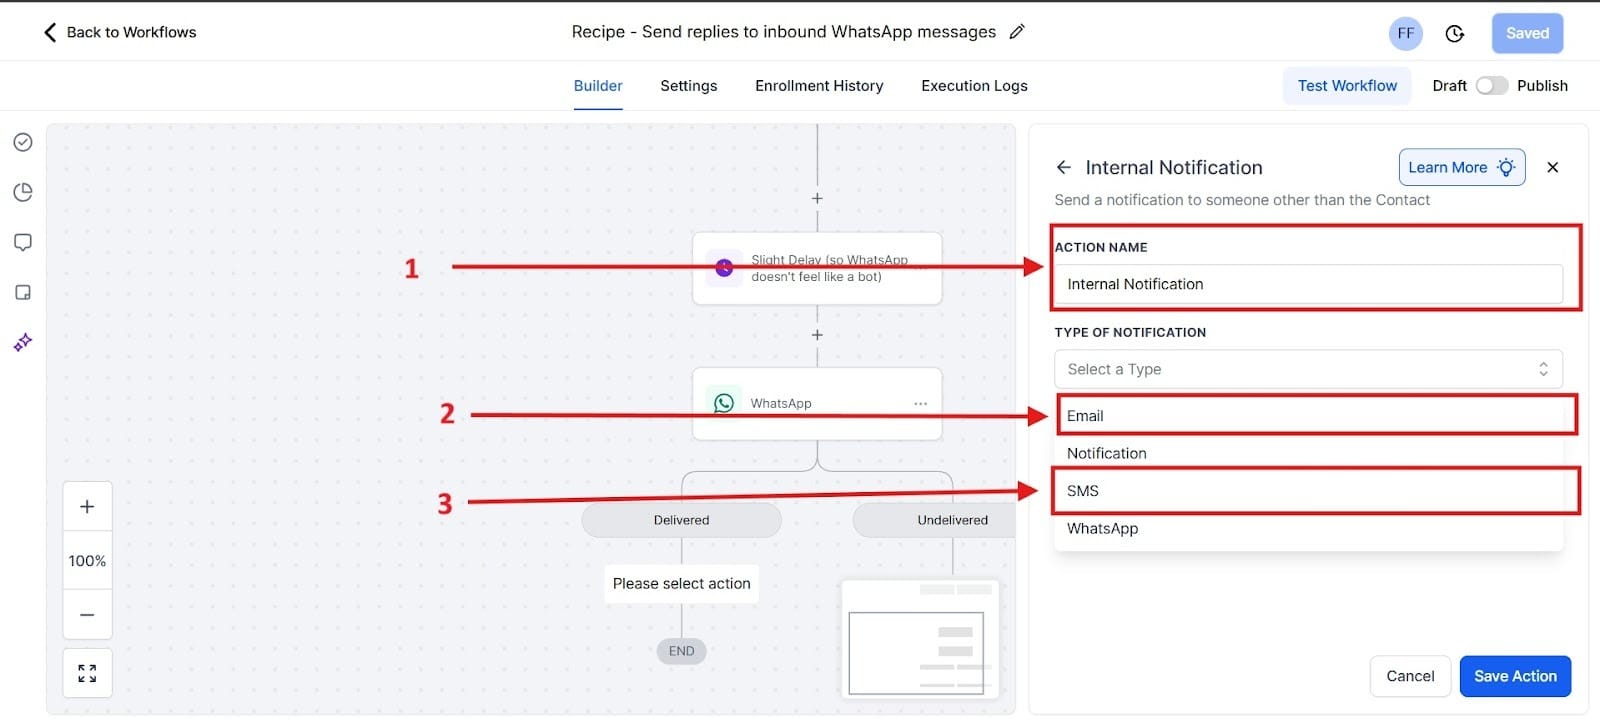
2. Action: Send Internal Notification
- Action: Add the action "Send Internal Notification."
- Type: Select "SMS" or "Email." (SMS is recommended for urgency.)
- Recipient: Select "User" (i.e., you).
- Message: You can pull contact variables directly into the message using custom fields:
- Template: "🚨 URGENT: [Contact Name] has been in the 'Warm Lead' stage for 72 hours. Time to call them again! Click here to view their file: [Contact Link Variable]."
This automation turns a passive, manual tracking task into an active, urgent reminder delivered directly to your phone. It forces you to maintain optimal sales momentum and ensures your pipeline is constantly being worked on.
To begin, select the red box one and look for what says, “Internal Notification.” Next, you’ll either choose red box 2 or red box 3 based on what you want to accomplish.
Scaling Your Time
By implementing these two foundational Workflows, you have moved from a manual, reactionary business model to an automated, proactive system.
Think about the time you just saved. No forgotten steps, no delays, and 100% adherence to your customized sales process. This is the ultimate definition of scaling yourself through automation.
How do you prove that these powerful automations are actually generating real dollars? The next step in mastering GHL is learning to analyze performance and make data-driven decisions. In the next post, we will simplify the GHL Analytics Dashboard, teaching you which reports matter most for proving ROI.
What is GoHighLevel?
Stop Losing Leads: How to Build Your First High-Converting Lead Magnet Funnel in GHL
End the Email Back-and-Forth: Master GHL Calendars for Zero-Friction Appointment Booking & Reminders
The Solopreneur's Quickstart Guide to GHL CRM: Pipeline Setup & Smart List Organization That Converts