You've mastered the internal machinery of GoHighLevel—capturing leads, booking appointments, and automating follow-up. But if your main website is still running on a separate, third-party platform, you’re losing time, breaking connections, and actively hindering your sales velocity. It’s time to unify your efforts and make your digital storefront an integrated conversion powerhouse.
Feature: Native Website & Blog Builder (Unified Digital Storefront)
The GoHighLevel (GHL) platform natively solves the common integration problem by providing a unified digital storefront where your website, blog, and CRM live together, converting browsing interest directly into qualified, tracked leads.
- Website Builder: A sophisticated drag-and-drop tool that eliminates the need for separate, external website platforms (like WordPress or Squarespace).
- Blog Builder: Converts your content marketing efforts into a seamlessly integrated lead generation channel, feeding subscribers and qualified readers directly into your CRM.
Benefits:
- Eliminate Integration Friction: Stop slowing down your site, breaking your tracking, and paying for expensive connector tools (like Zapier) to link an external website to your GHL CRM.
- Maximize Conversion Rate: Since the builder lives natively inside your CRM, every form, button, and booking link works perfectly by design, ensuring seamless lead capture.
- Perfect Tracking & Attribution: Every website visit, click, and submission is automatically tracked against the contact record, providing a clear, accurate view of your ROI without complex third-party scripts.
Practical Outcome:
By leveraging this native, unified platform, you will transform your digital storefront from a passive brochure into an active, high-converting conversion engine that automatically manages lead tracking and workflow activation, eliminating integration headaches and accelerating your sales cycle.
Watch this video to learn how to use the Blog Builder to boost your website's conversion rate:
Setting Up the Basic Marketing Site Structure
When building your primary website in GHL, start with a Website (for a multi-page site) rather than a Funnel (which is designed for single-purpose conversion paths).
The Home Page: Clarity is King
The Home page must quickly answer three questions: What do you do? Who do you serve? What should they do next?
Building the Homepage
- Create the Site: Navigate to Sites > Websites and click "New Website." Choose a clean template or start from scratch. I would recommend starting with a template since it gives you a foundation of professional design, and it’s more cost-effective than building a website from scratch.
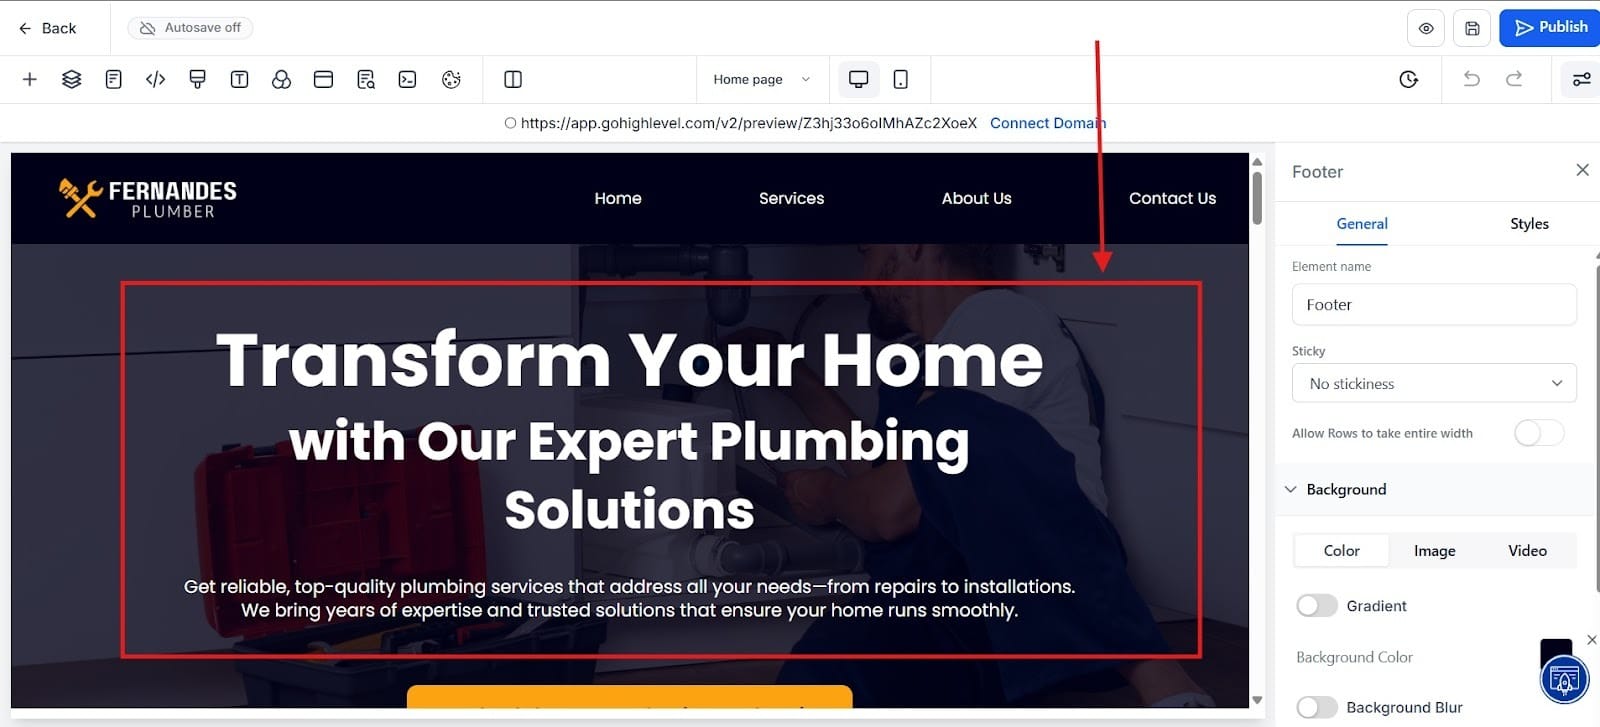
- The Hero Section: Focus on a strong H1 headline, a sub-text describing the benefit you provide, and a Primary CTA button. This button should link to your Calendar (from Post 3) or your main Services page (Step 2). I highlighted the hero section in the red box below. The hero section is the first part you see when going onto a website without the need to scroll. I highlighted what the hero section looks like in the red box in the image below.
- Adding Navigation: Use the Navigation Menu element in the header. Keep your primary links simple: Home, Services/Pricing, and Contact/Book Now.
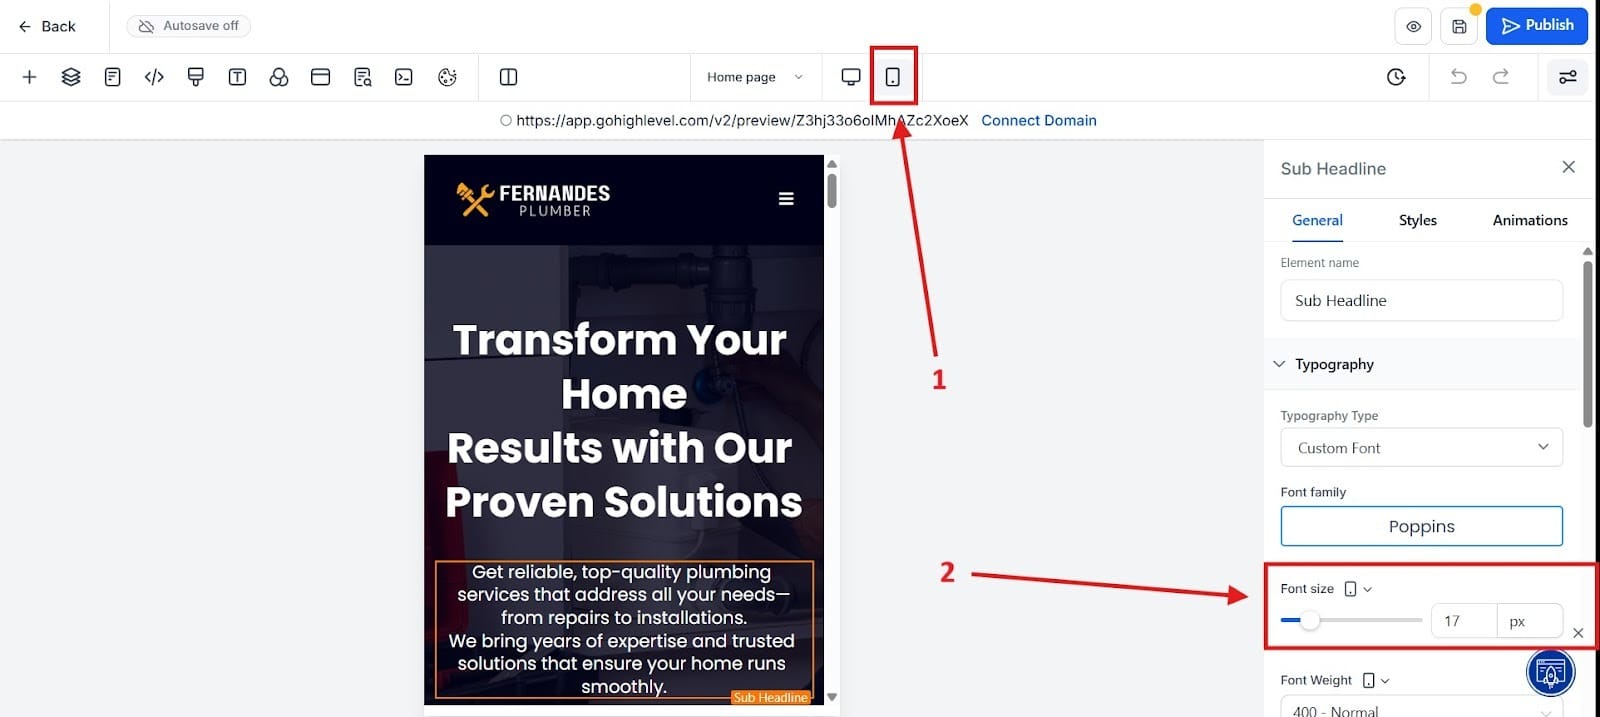
- Crucial Check - Mobile Responsiveness: Use the toggle buttons at the top of the GHL editor to switch immediately to the mobile view. Always check this before publishing. You must adjust padding and font sizes in the mobile view to ensure readability, as over 60% of traffic comes from phones. I highlighted where to find the mobile view in red box number 1. If necessary, you may also need to change the font size, which I highlighted in red box number 2.
The Conversion Page: Services or Pricing
This page is where you provide the detail needed to convince a prospect and then convert them into a lead.
- Showcase Social Proof: Use the built-in Review element to display testimonials or case study snippets. People trust what others say more than what you say.
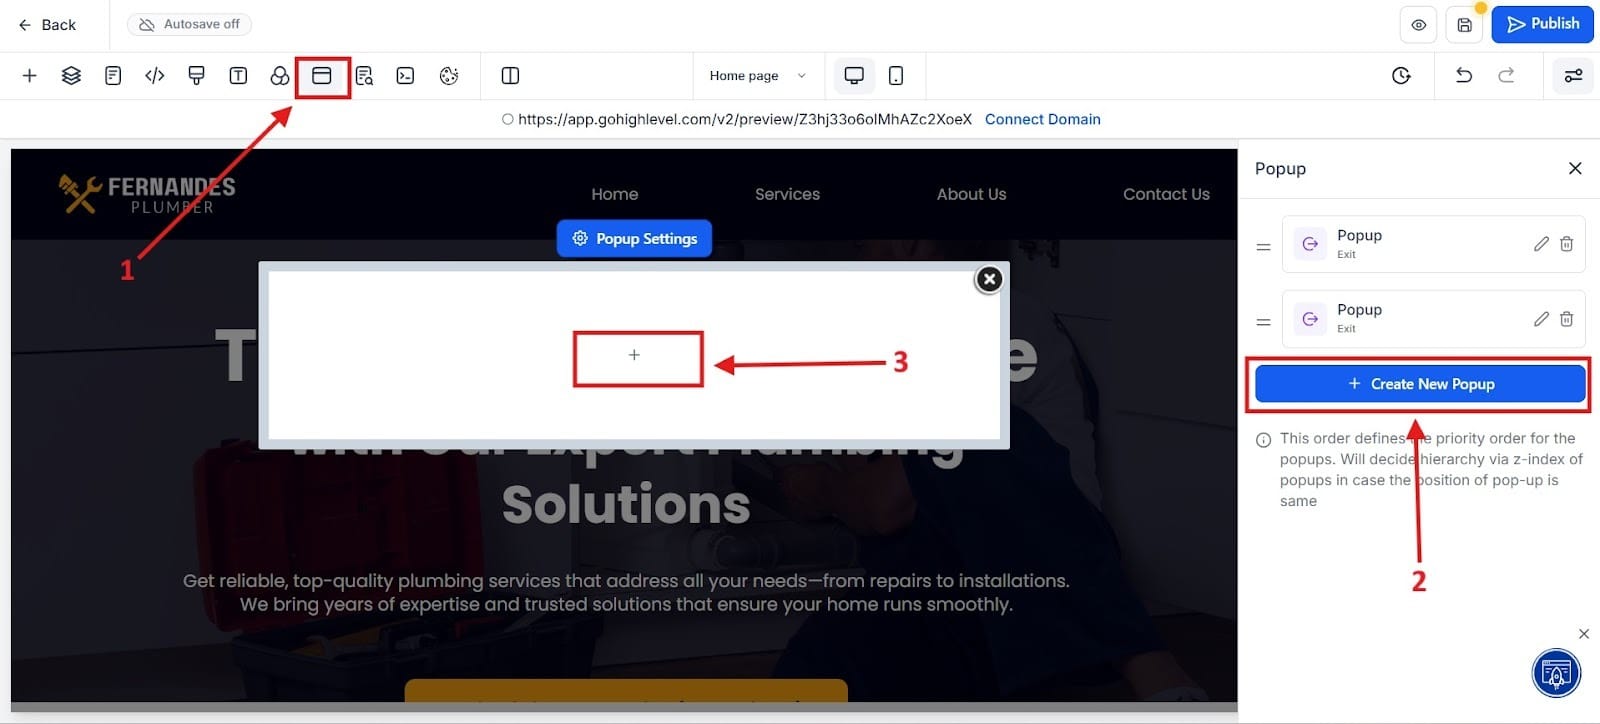
- The Conversion Trap: This page should contain a secondary, non-intrusive Call to Action (CTA) embedded directly in the content. Add the Form element (the Lead Capture Form you built in Post 1) into a dedicated section on this page. This process is a little tricky, so I’ll highlight it with images from two different steps. First, go to the top part highlighted in red as number one. It will say “Popup Settings.” Next, follow the number 2 and click on “Create a new Popup.” Finally, for number 3 click the plus sign found in the middle of the screen.
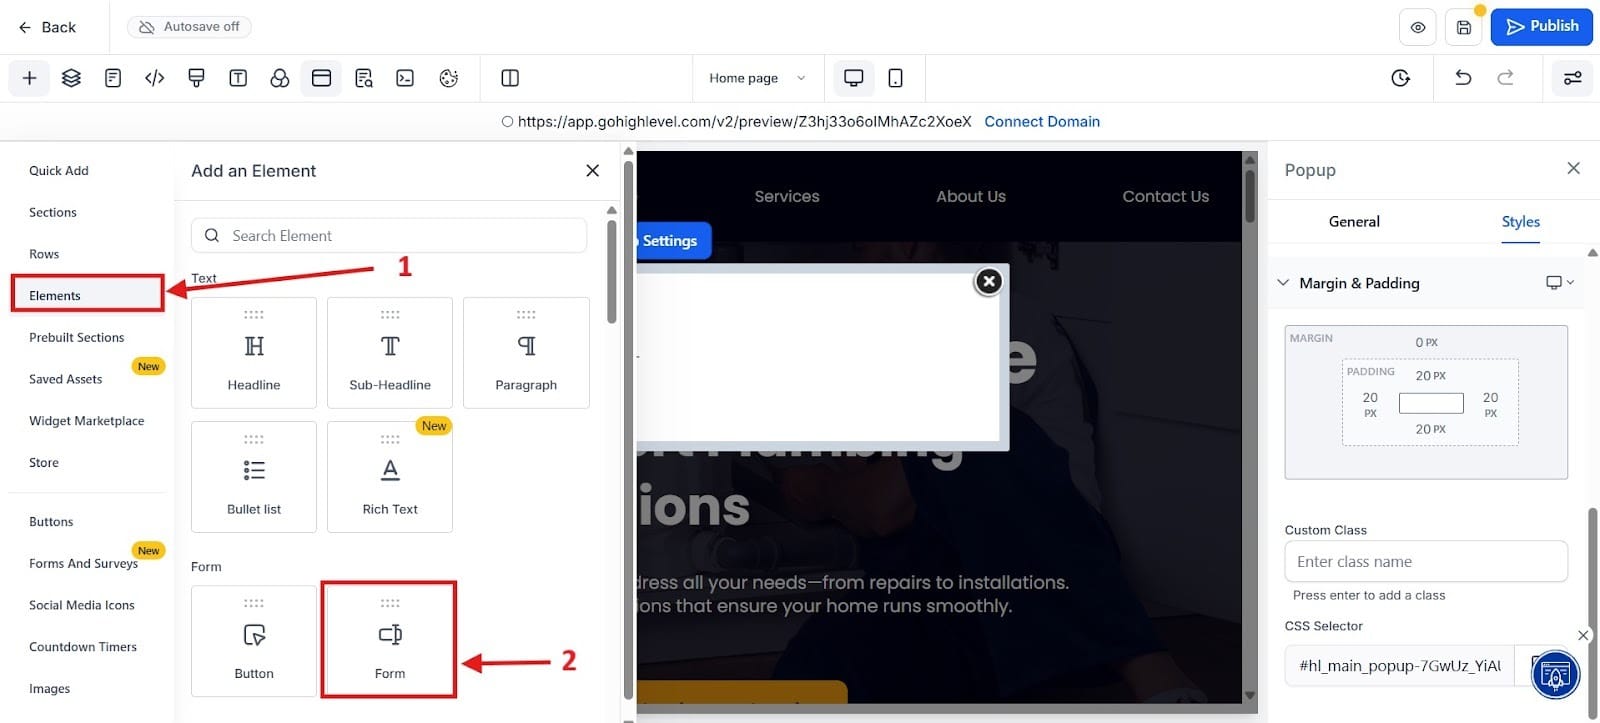
For the next part, you will go into the elements section to add an element, which I highlighted in red as number 1. Next, go to the forms section to add a form.
The Essential Contact & Legal Pages
Create simple pages for Contact Us (with the form again) and Privacy Policy/TOS. These build trust and ensure compliance, especially if you plan on running ads.
Building the Blog Hub
Your website handles immediate sales, but your Blog is your long-term, passive lead capture engine. It’s how you capture organic traffic from search engines (Google).
Understanding the Blog Structure in GHL
The GHL Blog operates with three main elements:
- Blog Index/Home Page: The page that lists all your published posts.
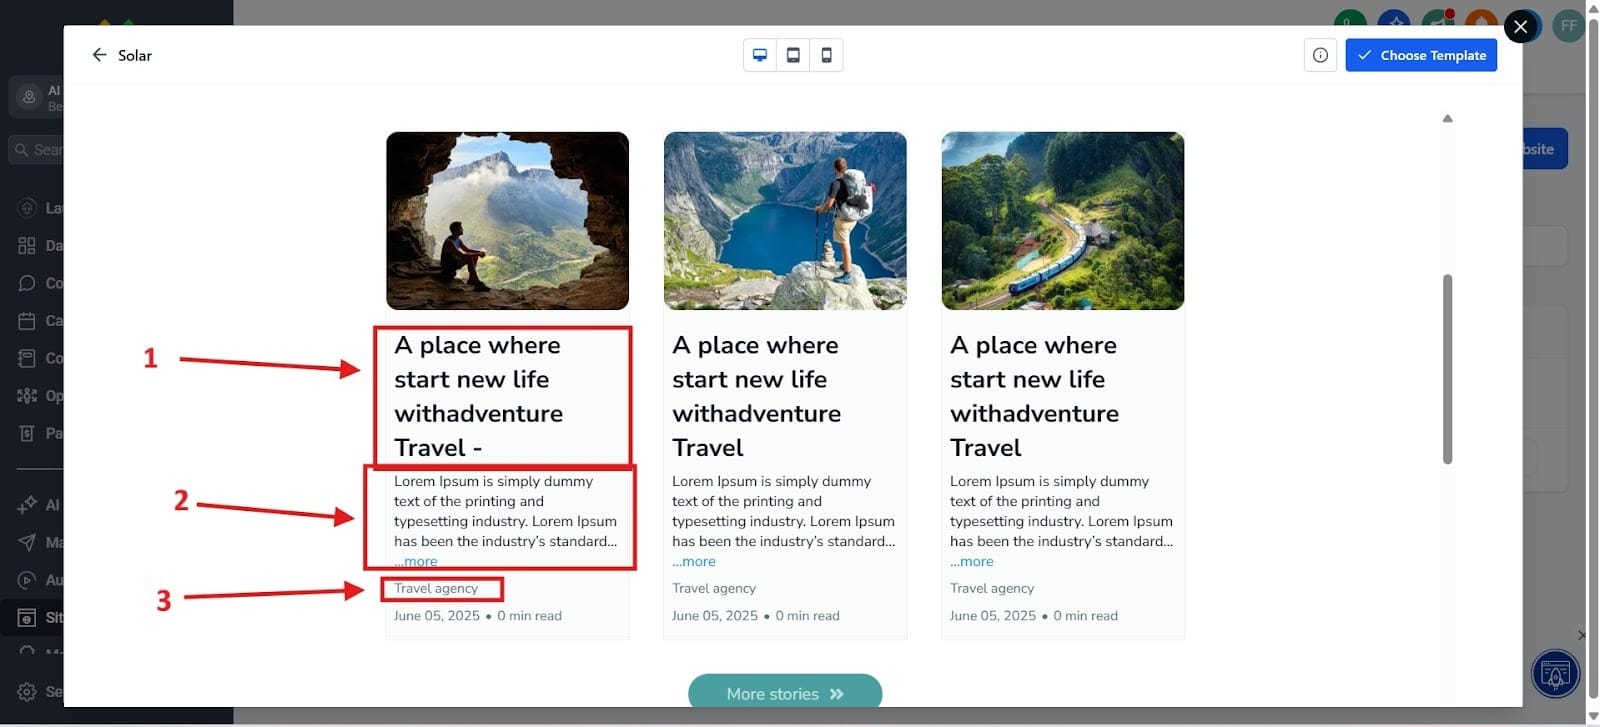
- Blog Post Template: The master design applied to every single article you write. This is the most crucial part to set up correctly.
- Categories and Tags: For organizing content and improving site navigation.
Setting up the Post Template
- Navigate to Sites > Blog. Click "Template" to edit the master design.
- Template Structure: The template must contain Dynamic Elements that pull data from the individual blog post you write. Key dynamic elements include:
- Post Title: Displays the title of the article.
- Post Content: Shows the body text you write.
- Author/Date: Highlights the metadata.
I show this below so that you can more easily visualize it. I highlighted the title as number 1. The section for post content is number 2. The author and date is number 3.
The Conversion Strategy: The Sidebar Opt-In
Your blog’s main goal is to convert readers into potential leads. The most effective way to do this is with an inescapable sidebar opt-in:
- The Sidebar: Use a Static Column/Element in your template design for the sidebar.
- Embedding the Form: Drag and drop the Form Element into the sidebar (e.g., "Download My Free Checklist").
- The Automation Link: Here you would want to say that when a reader submits this Form, it triggers the New Lead Nurturing Workflow. Every piece of free, valuable content you write now works 24/7 to capture and nurture leads automatically.
Publishing Your First SEO-Focused Post
Once the templates are set up, publishing is quick. The focus shifts to optimization to help search engines find you.
Creating and Structuring the Post
- Go to Sites > Blog > Posts and click "New Post."
- The Editor: Use the simple visual editor to write your content. Add media, format your headings (H2s and H3s), and use bullet points for readability.
- Assigning Metadata: Assign the post to a Category (e.g., "Automation Tips") and add relevant Tags (e.g., "GHL", "CRM").
SEO Optimization (The Google Checklist)
This step is non-negotiable for organic traffic:
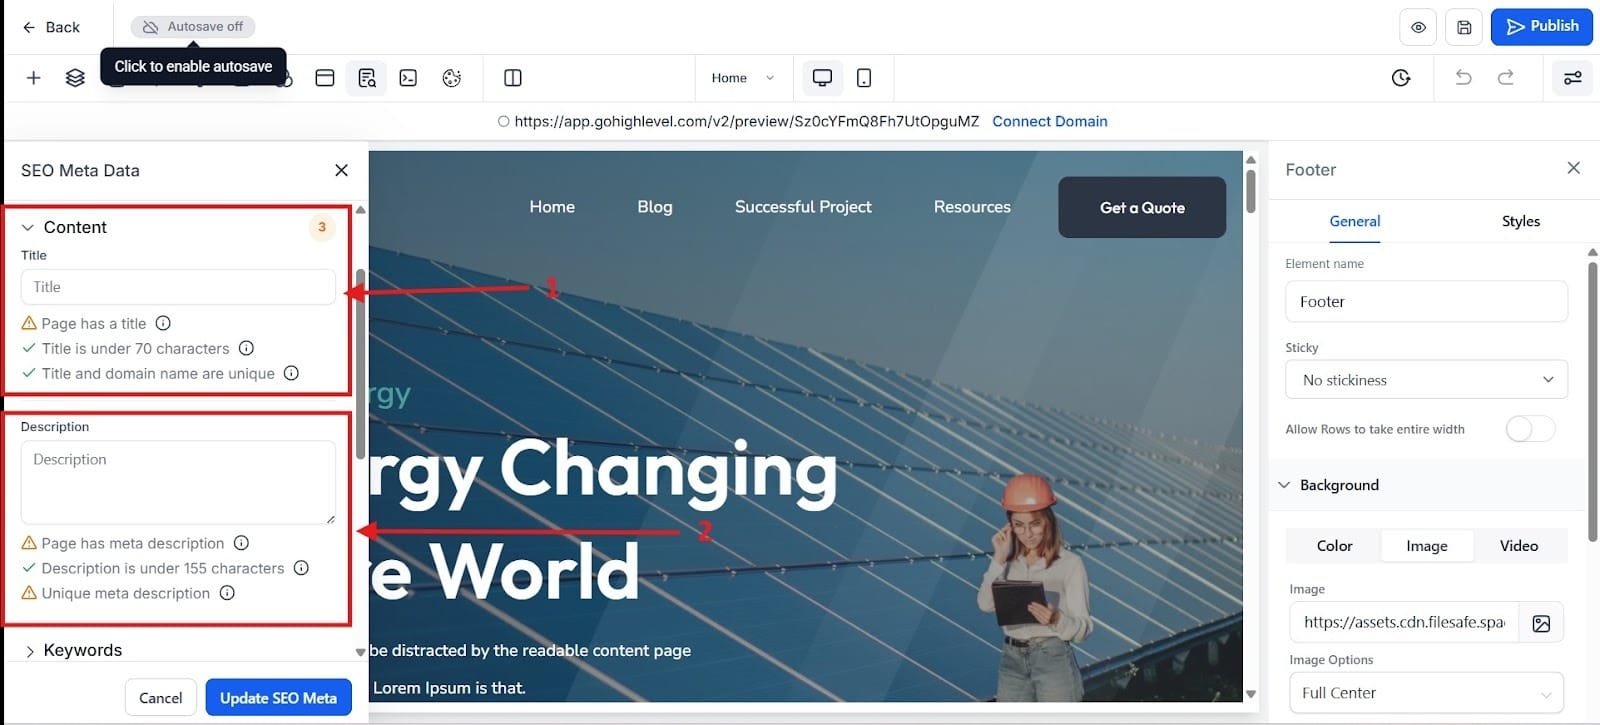
- Access SEO Settings: Click the Settings tab within the blog post editor.
- SEO Title: This is what appears as the clickable blue link in Google search results. It must be compelling and include your main keyword.
- Meta Description: This is the short summary snippet that appears under the title. It should be a 1-2 sentence pitch that encourages users to click.
- URL Slug: Ensure the Post URL Slug is clean and descriptive (e.g., /workflow-wizardry instead of /post-1234).
- Publish: After checking the mobile preview one final time, click Publish.
In the image below, I highlighted where you would put the meta-title in red box number one. In red box number 2, you would put the meta-description.
From Static Site to Lead Generator
You've done it. You now have a complete GHL system: a multi-page Website to introduce your business, a dedicated Blog to capture organic traffic, fully integrated Forms to intake data, Workflows to automatically follow up, and a Pipeline to manage the entire process.
Your website is no longer a static brochure—it is a sophisticated, highly automated lead generation machine.
But how do you know if your beautiful new website and blog are actually performing? How do you prove that the time spent on that blog post or that new Services page translated into booked appointments and sales?
The final, crucial step in mastering GHL is learning to analyze performance and make data-driven decisions. Next, we dive into the Analytics Dashboard to show you how to measure traffic, conversion rates, and the true, measurable success of your GHL marketing machine.
Check Out The Other GoHighlevel (GHL) Articles:
What is GoHighLevel?
Stop Losing Leads: How to Build Your First High-Converting Lead Magnet Funnel in GHL
End the Email Back-and-Forth: Master GHL Calendars for Zero-Friction Appointment Booking & Reminders
The Solopreneur's Quickstart Guide to GHL CRM: Pipeline Setup & Smart List Organization That Converts